
How to integrate your Magento 2 site with Facebook
There is a lot of confusion going on regarding how to integrate the Magento website with Facebook.
How do you open a Facebook shop? Does it work on mobile? What is a Facebook feed file? How do you publish your Magento products on the Facebook shop? How do you sync your Magento products with your Facebook Dynamic Ads account? And what on earth is the difference between just Facebook Ads and Facebook Dynamic Ads?
And the most important question - do you really need an extension to integrate your Magento 2 site with Facebook?
I will answer all these questions in this article. I will also explain what Facebook Pixel is, how does it work, and why it is crucial to have it when you run Facebook Dynamic Ads.
And finally, I will provide you with a step by step guide how to integrate your Magento site with Facebook without an extension.
In the end, I will present our Facebook Shop extension and explain how it can save your time with integration with Facebook. If you are only looking for the free solution - please just skip this part.
Understanding the Terms
Let me first briefly go through the terms, and help you to get rid of all the confusions.
Facebook Shop
This is the shop that is located in your Facebook page under the “Shop” tab. For example, here is a screenshot of our (Mexbs) Facebook shop:
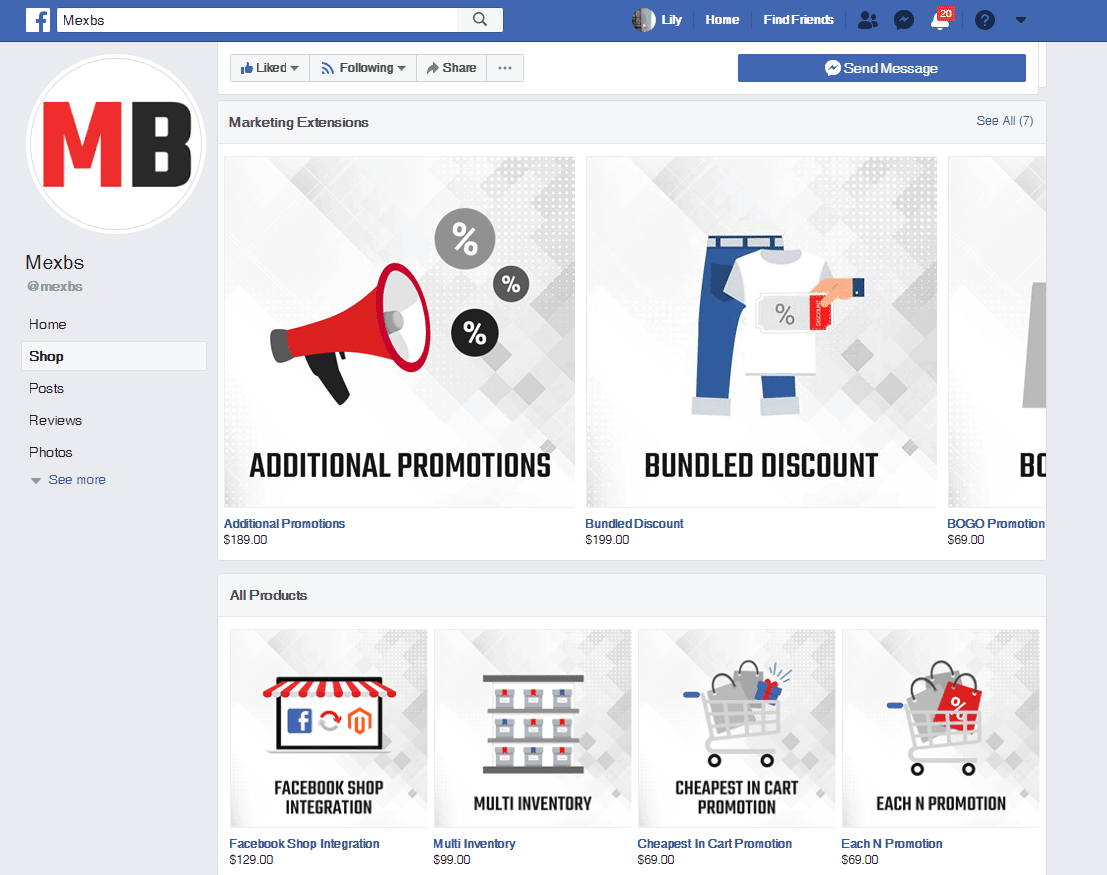
You can see that the “Shop” tab is highlighted on the left.
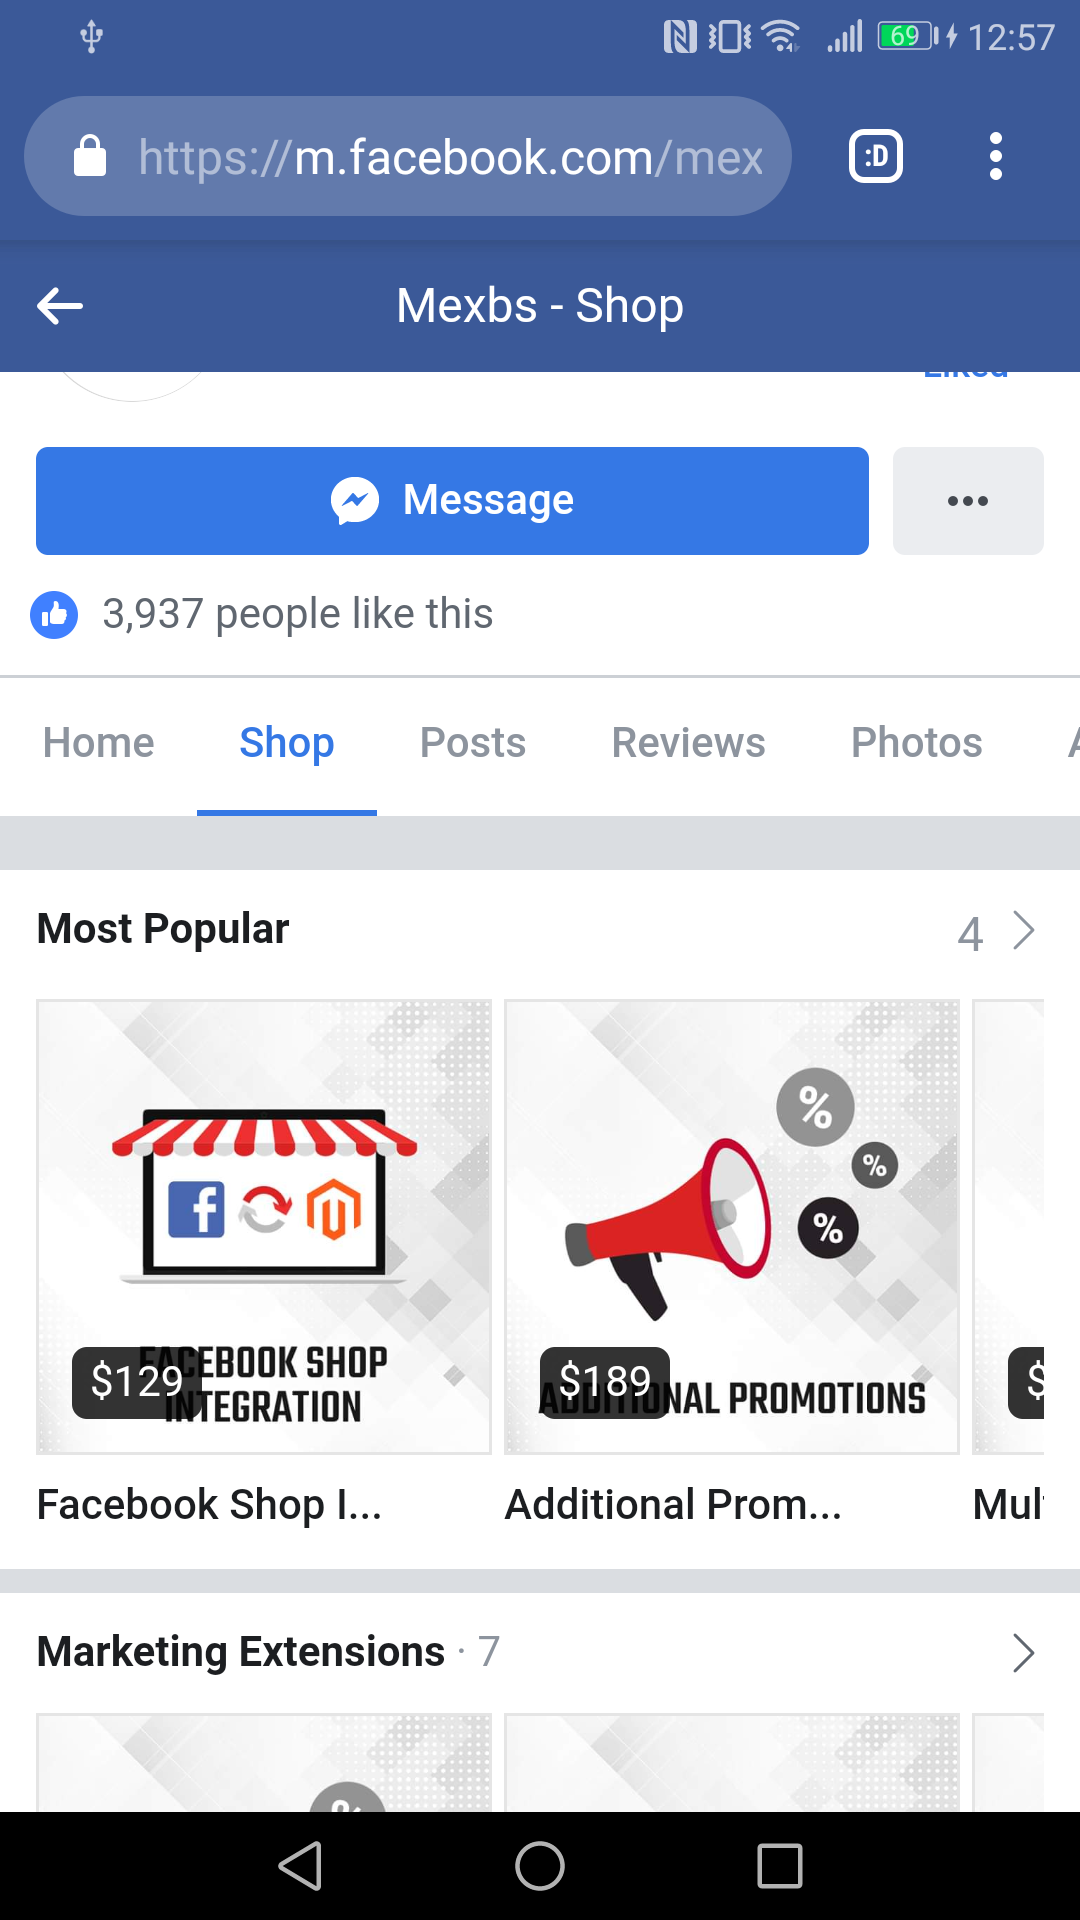
Does the shop tab work on mobile?
Since the “Shop” tab is a native Facebook tab - it is visible on all devices (mobile, desktop and tablets). Here is the screenshot of how our Facebook shop looks on mobile:
So why do you sometimes hear about Facebook shops that are not working on mobile?
It happens because some companies offer a non-native Facebook shop integration. That is, they add their own “Shop” tab to your Facebook page, and they show your products in this tab. The problem with that is that Facebook only allows native tabs on mobile. That is why these integrations don’t work on mobile.
On the other hand, other companies offer a native Facebook shop integration. For example our Facebook Shop Integration extension. Using this extension, the shop tab works on mobile.
However, you can integrate your shop yourself (in the native way that works on mobile) without a need for an extension. In the next sections, I will explain to you how to integrate your Magento 2 site with Facebook, without extension.
Facebook Feed File
This is the CSV file (can also be TSV or XML) that contains the records of your products.
You provide this file to Facebook, and Facebook uses it to populate your shop with products. In “The Step by Step guide to integrating your Magento website with Facebook (without extension)” I will show you how to create, use and upload the feed file to Facebook.
Here is, for example, how the feed file of our Facebook shop looks like -

You can also download it from here.
Facebook Pixel
Facebook pixel is basically a piece of tracking code that you get from Facebook. (Here is a guide of how to get your Facebook pixel tracking code). Once you put it on your website source code, Facebook starts recording your customers' behavior.
However, it is not enough just to paste the pixel base code. The base code will only track the URLs and the people who visited your website, but it won’t track the events (add to cart, purchase, add to wishlist, etc).
For the pixel to track your events, you need to set them up. You can set up the events manually by adding pieces of code to pages that indicate the event (for example - adding the purchase event code to the checkout success page).
Check out the Facebook pixel setup guide for the detailed guide.
An alternative way of setting up your events is using Magento extension for it. I recommend this option because there are some excellent free extensions out there. We are currently using the Apptrian Facebook Pixel extension, and it works great for us.
Facebook Ads
Facebook ads are as it sounds - all types of ads that you can create in Facebook. It can be a post-boost, a page-boost, an image and text ad, or a “Dynamic Ad.” It is basically the boosts plus any ad that you can create through the ad manager -
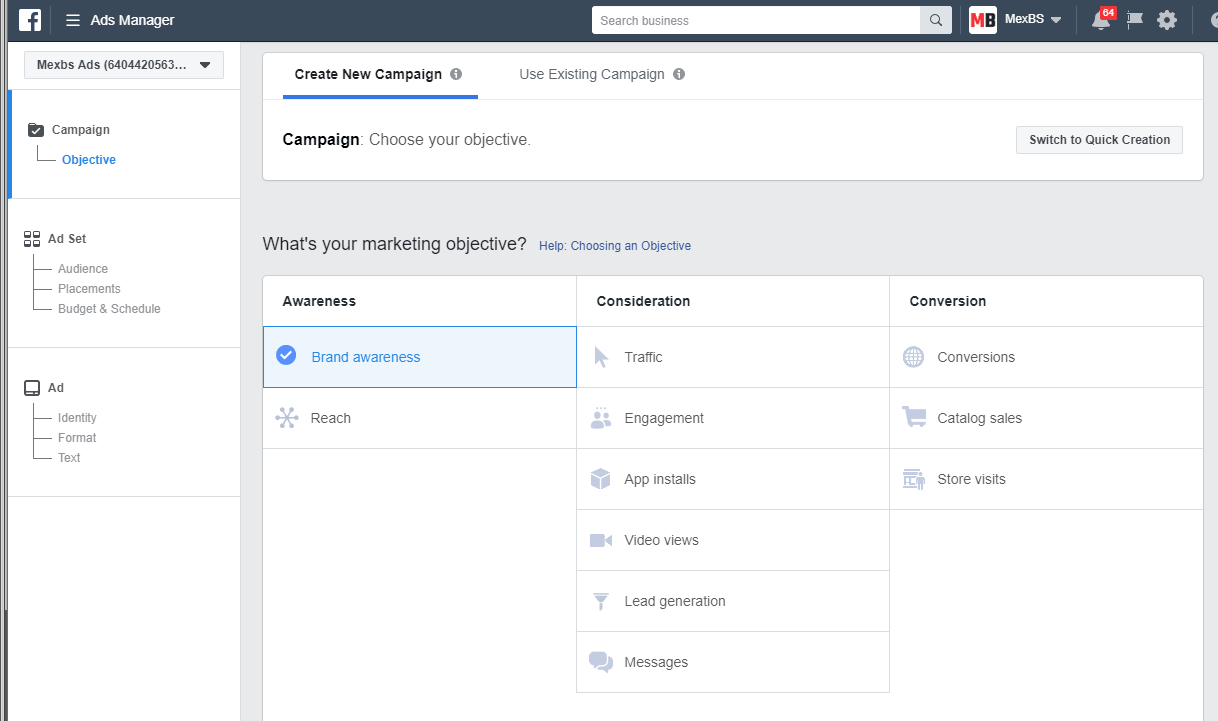
Facebook Dynamic Ads
Facebook Dynamic Ads are simply the ads that you create when you select the “Catalog Sales” in the “Objective” when you are creating your ad -
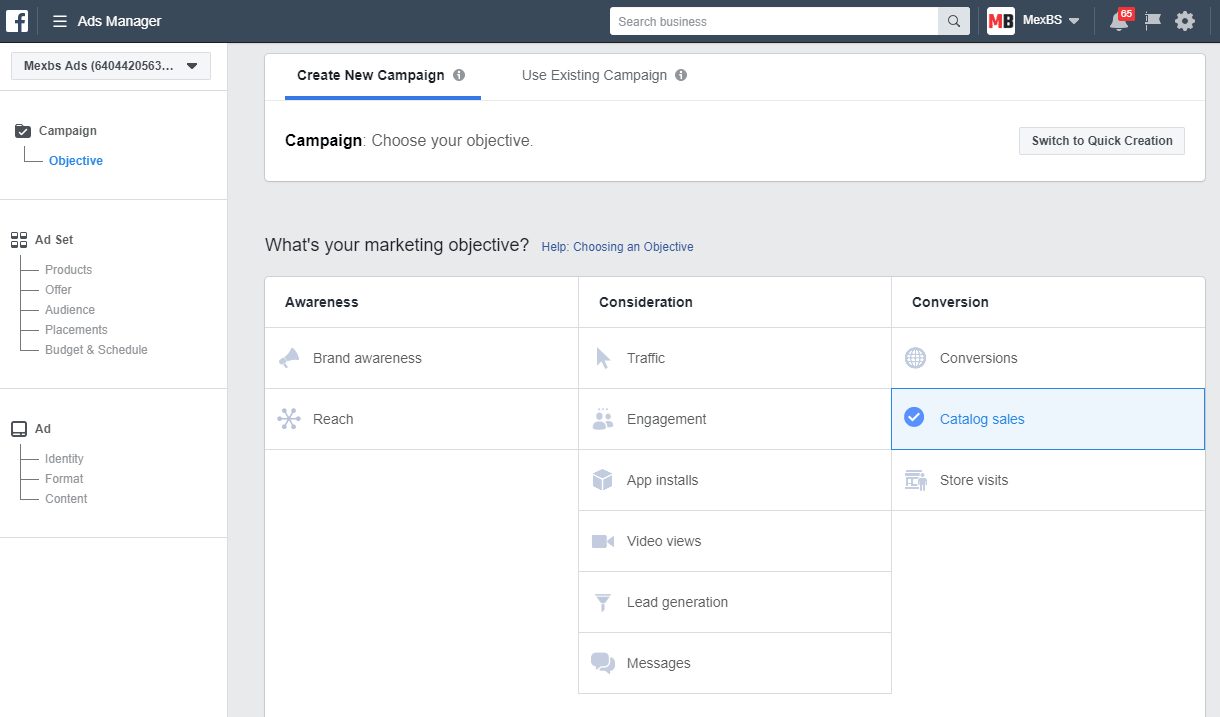
Apart from that, the dynamic ad configuration is very similar to the regular ad. There are basically two key differences between the regular Facebook ads and the Facebook Dynamic ads:
- The Dynamic Ad allows you to use your products data as variables for your ad. (More about that in a few seconds)
- In combination with the Facebook pixel, Dynamic ads have a compelling feature - it allows you to display the products to dynamic audiences based on their behavior.
Examples:
- Re-targeting cart abandoners and hesitators. That means that you can display the product that the customer looked at, but didn’t buy, in his Facebook feed.
- Displaying related or cross-sell products to customers who’ve purchased from you in the past.
Using products data as variables in the Dynamic Ads
So let's go back to the Dynamic Ad creation screen.
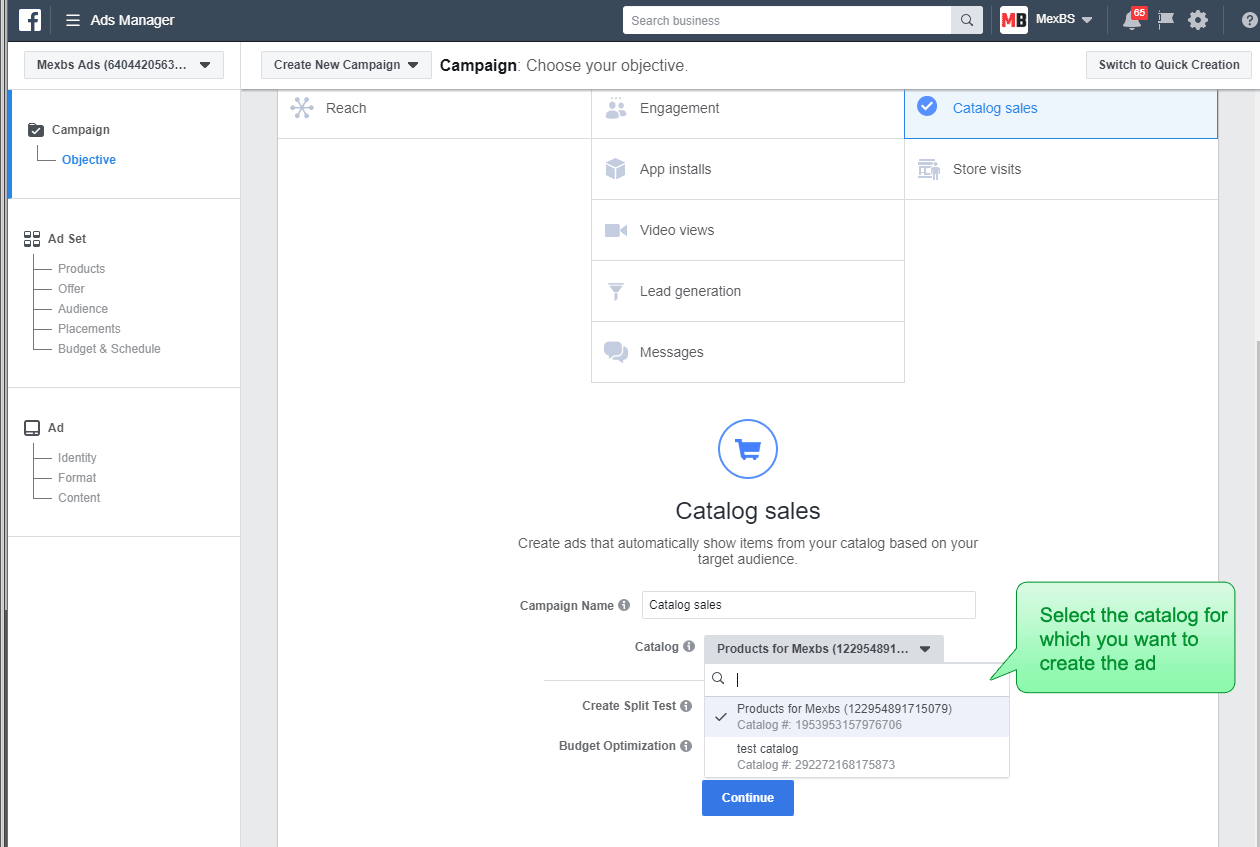
After selecting the objective (Catalog Sales), Facebook asks you to choose the catalog that you are basing your ad on -
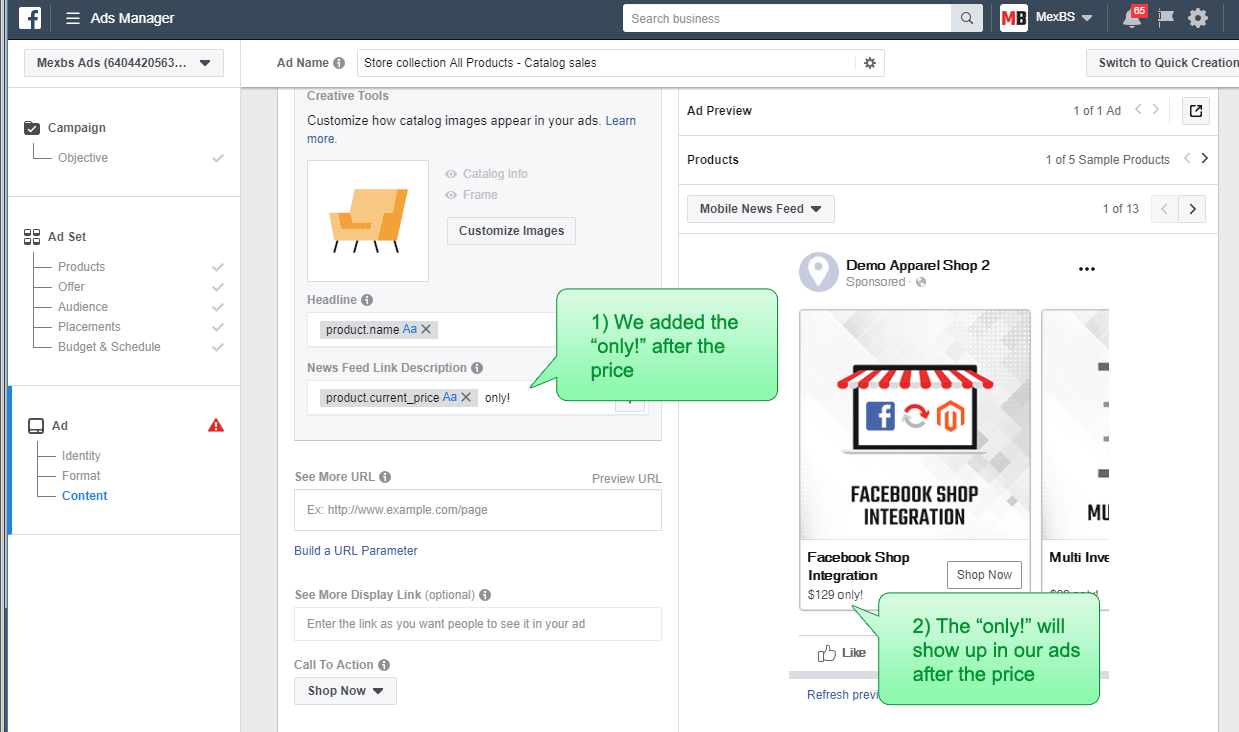
Afterward, it lets you select the format of your ad, where you can use your product data as variables.
For example, you can create a carousel of products and add some custom text next to the price. You can see in the following screenshot that we added the text “only!” after the price in the ad template.
Basically, dynamic ads save you time and headache. That is, you can create a carousel of products with the regular ads as well. But you will need to upload images manually and insert the text manually. And once you make some changes to your products, you will need to go to the ad and apply the changes manually. With dynamic ads - the ads will update automatically on every product change.
Do you really need an extension to integrate your Magento site with Facebook?
So you have a Magento site, and you want the Facebook users to explore your products directly on Facebook. How do you proceed?
When you type “Magento 2 Facebook shop” or “Integrate Magento 2 with Facebook” on Google - tons of extensions show up. One of them is our Facebook Shop Integration extension.
So do you really need an extension to integrate your Magento site with Facebook?
The short answer is “no”.
The longer answer - it depends on how much products you have in your website and how frequently they change.
Let’s look at how to integrate your Magento 2 site with Facebook without any extension. Afterwards, we will discuss why you might want to get an extension to help you to automate the integration and save you some valuable time.
The Step by Step guide to integrating your Magento website with Facebook (without extension)
Step 1 - open a Facebook page
There are 2 possible reasons why would you want to integrate your Magento 2 site with Facebook -
- You want to be able to sell your products directly from your Facebook page
- You want to be able to create dynamic ads
If you only need to be able to create dynamic ads, you can skip to step 3.
Otherwise, stick with me - if you don’t have a Facebook page you need to create one. It is very easy to do. Go to www.facebook.com, click on “Pages” on the left, and then click “Create Page”. I won’t cover the page creation in this manual, because it is fairly straightforward.
Step 2 - add a shop tab to your Facebook page
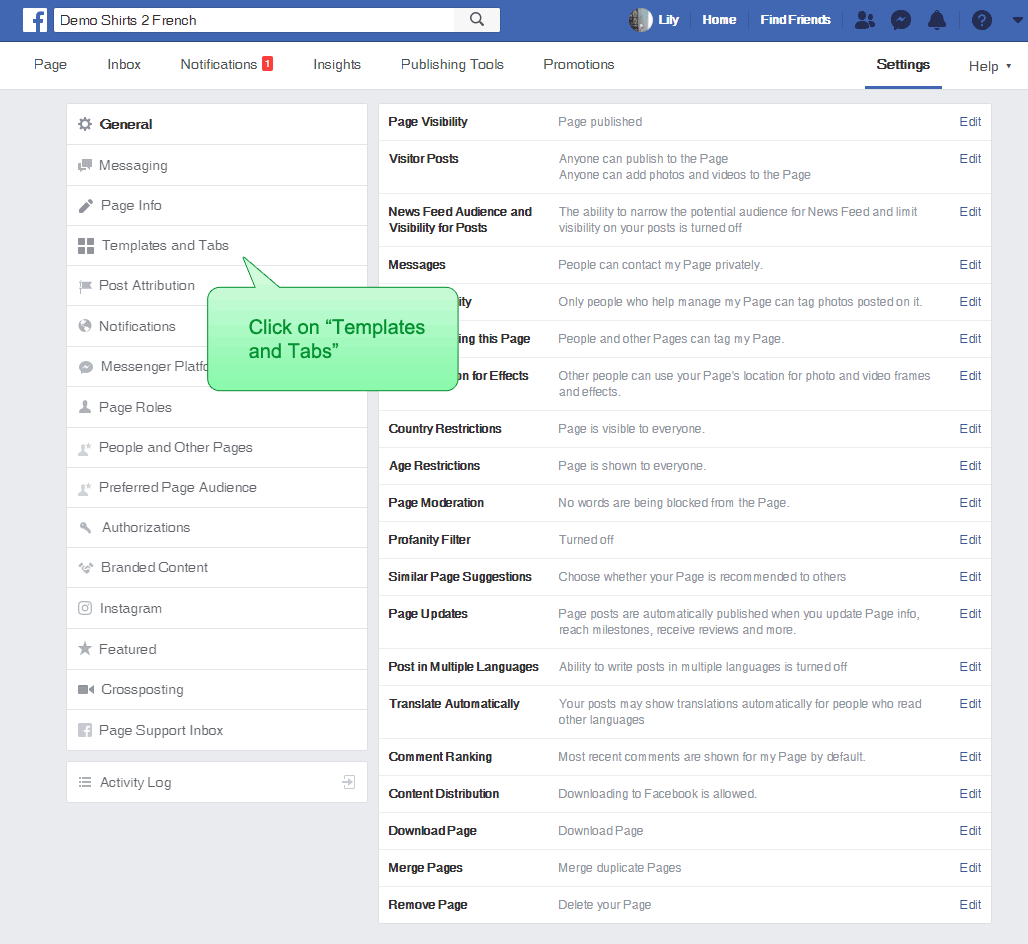
Go to your Facebook page. Click on "Settings" on the top right. Click on “Templates and Tabs” and scroll to the bottom -
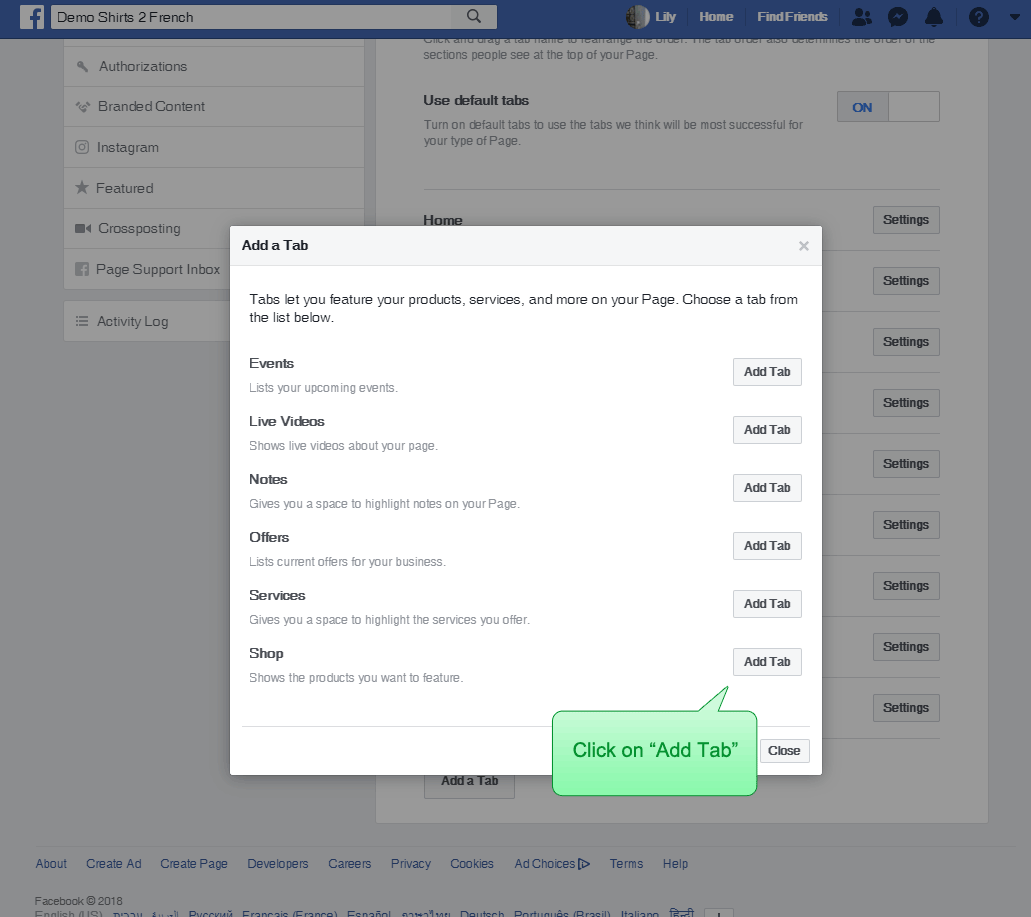
Click on “Add a tab”. In the popup, click on the “Add Tab” next to the “Shop” line -
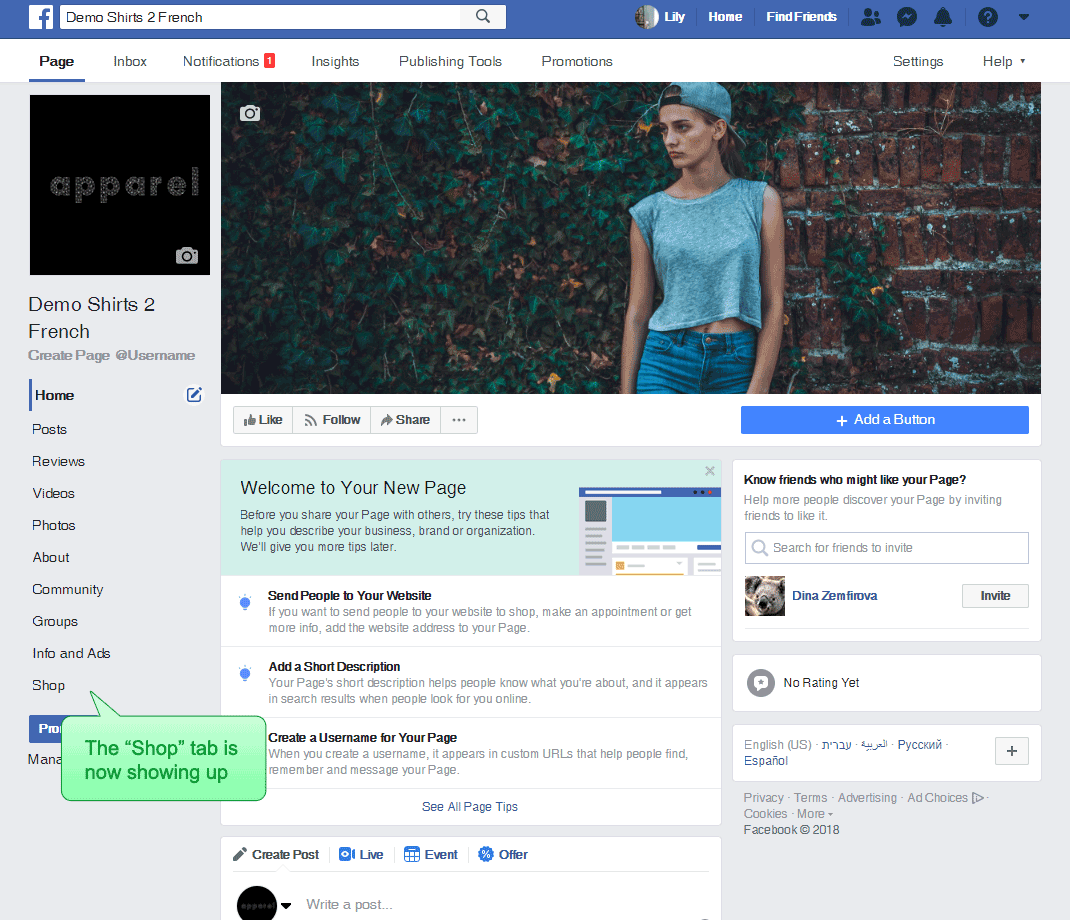
The “Shop” line should now disappear. Click on “Close” to exit the popup. Now go back to your page view by clicking on “Page” on the top left. You should see the “Shop” tab showing up in your tab list -
Click on the “Shop” tab, you should get a popup. Check the “I agree” checkbox and click “Continue” -
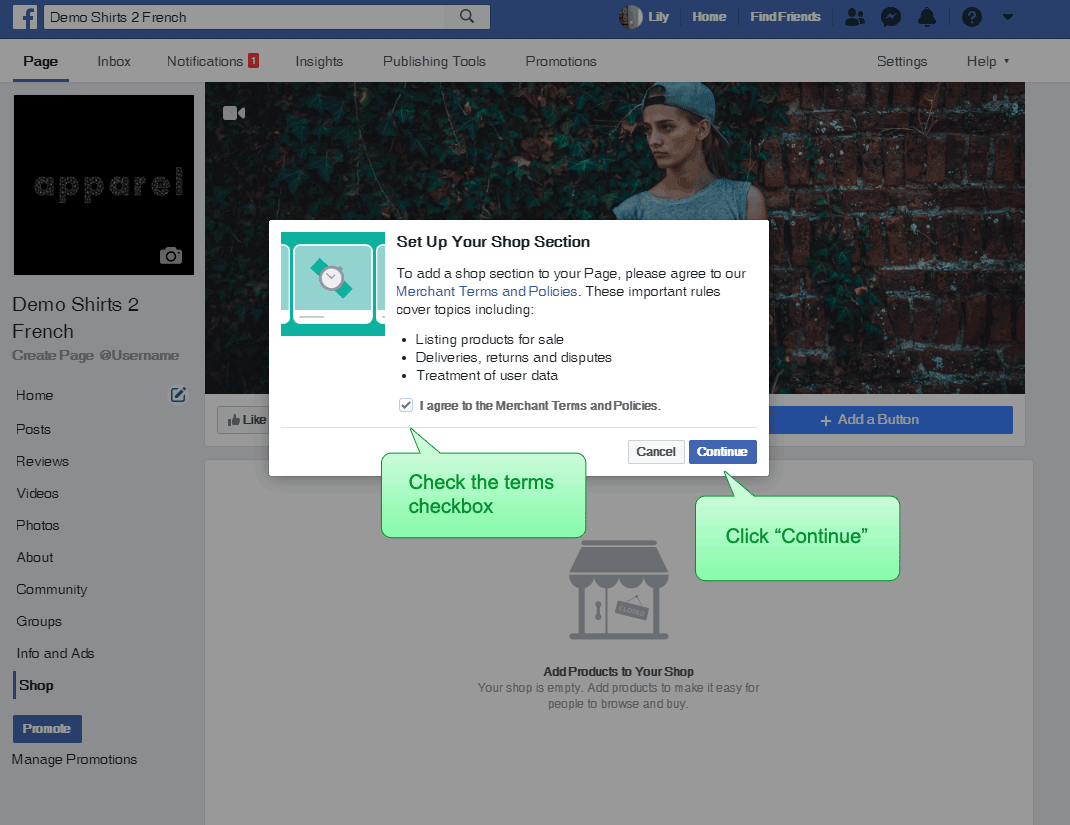
You should get another popup. Select your checkout method (“Message to buy” or “Check out on another website”). In this tutorial, we will select “Check out another website”, as we want the customers to perform the purchase on our website. Click “Continue”. In the following popup select your Magento store currency and click “Save”.
Step 3 - create a Facebook Business Manager account
To be able to sync your Magento products with your Facebook shop (or Dynamic Ads catalog) you will need a Facebook Business Manager account. To create one, simply go to https://business.facebook.com and create one.
Note: the person whose credentials you use to create a Facebook Business Manager account has to be the admin of your Facebook page. Otherwise, you won’t be able to do any manipulations on the Facebook shop products through this Business Manager account.
Step 4 - create a feed file and upload it to your server
As we explained before (in the “Understanding the Terms” section) - Facebook feed file is simply a CSV / TSV or an XML file that contains records of your products. Each record holds some pieces of information about your product - eg: name, description, price, etc.
In the next steps, we will tell Facebook the location of this file, and it will use this file to populate the products of your Facebook shop or the Dynamic Ads catalog.
So let's create your feed file. You can do this by downloading the feed file of our (Mexbs) website here. Just fill in the relevant columns with the information of your product. For more information about the product fields, see the Facebook official documentation about the catalog feed. You can see that there are required and optional fields. Our file, for example, is mostly empty, as most of the fields are not relevant for our products.
Once finished creating your feed file, upload it somewhere on your server where Facebook will have access to it. I recommend the pub directory (because it is intended to be public).
Step 5 - create and configure a Facebook product data source for your catalog
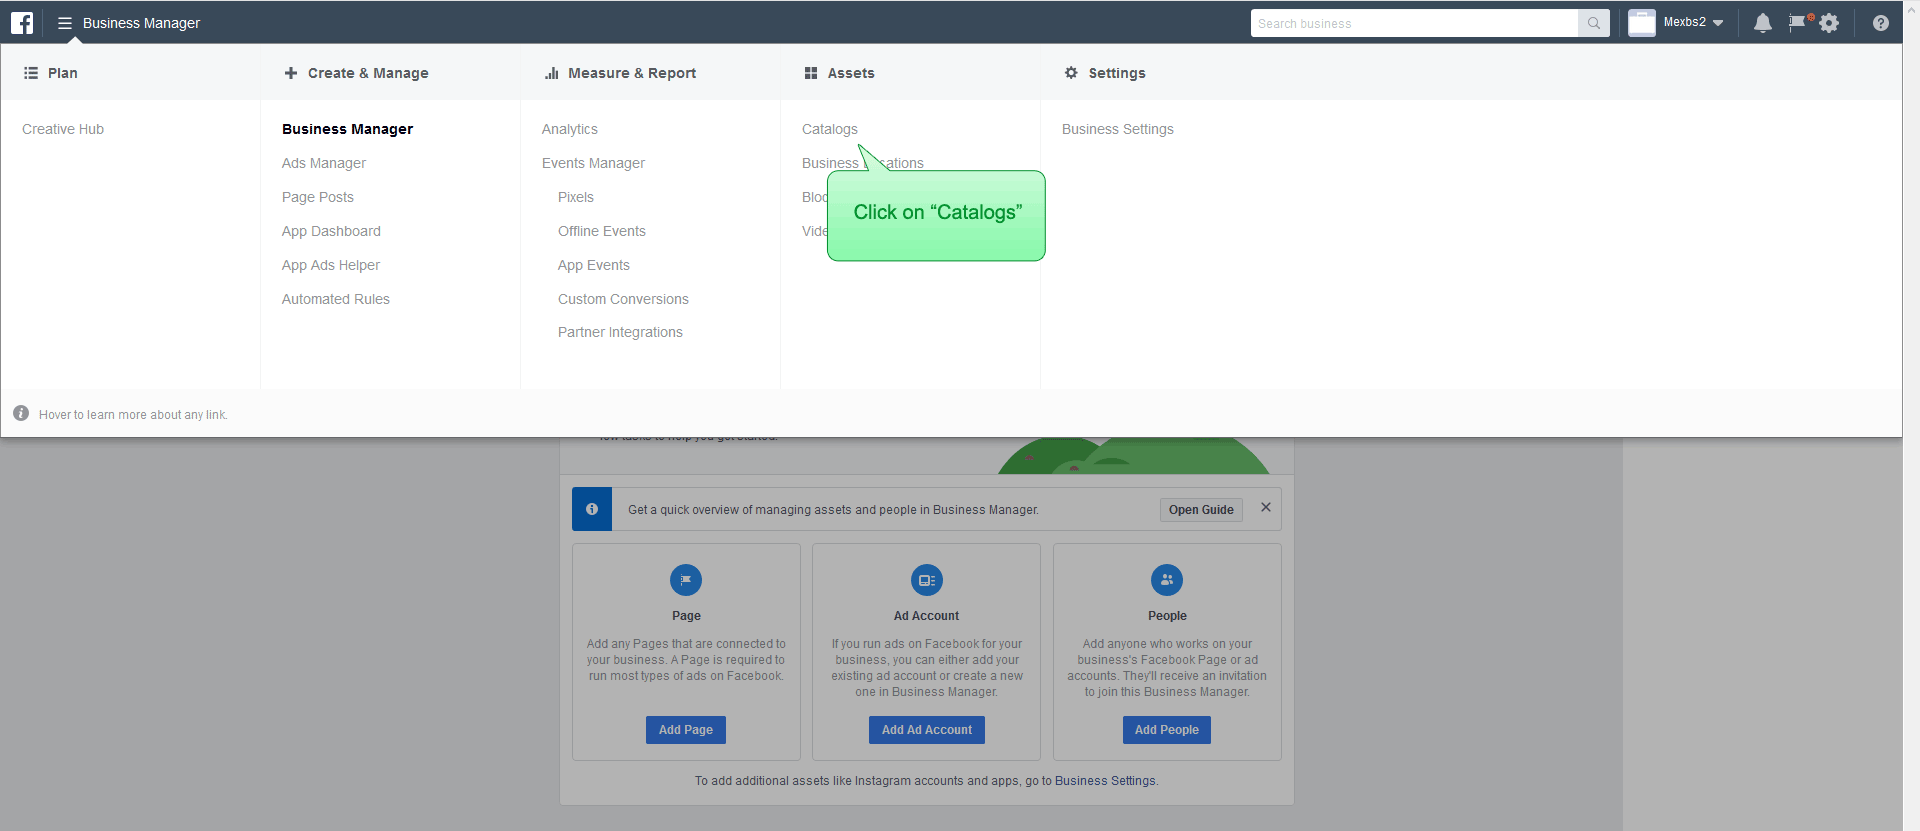
Go to the Facebook Business Manager. Click on the “Business Manager” link on the top left. A mega menu should open. Click “Catalogs” -
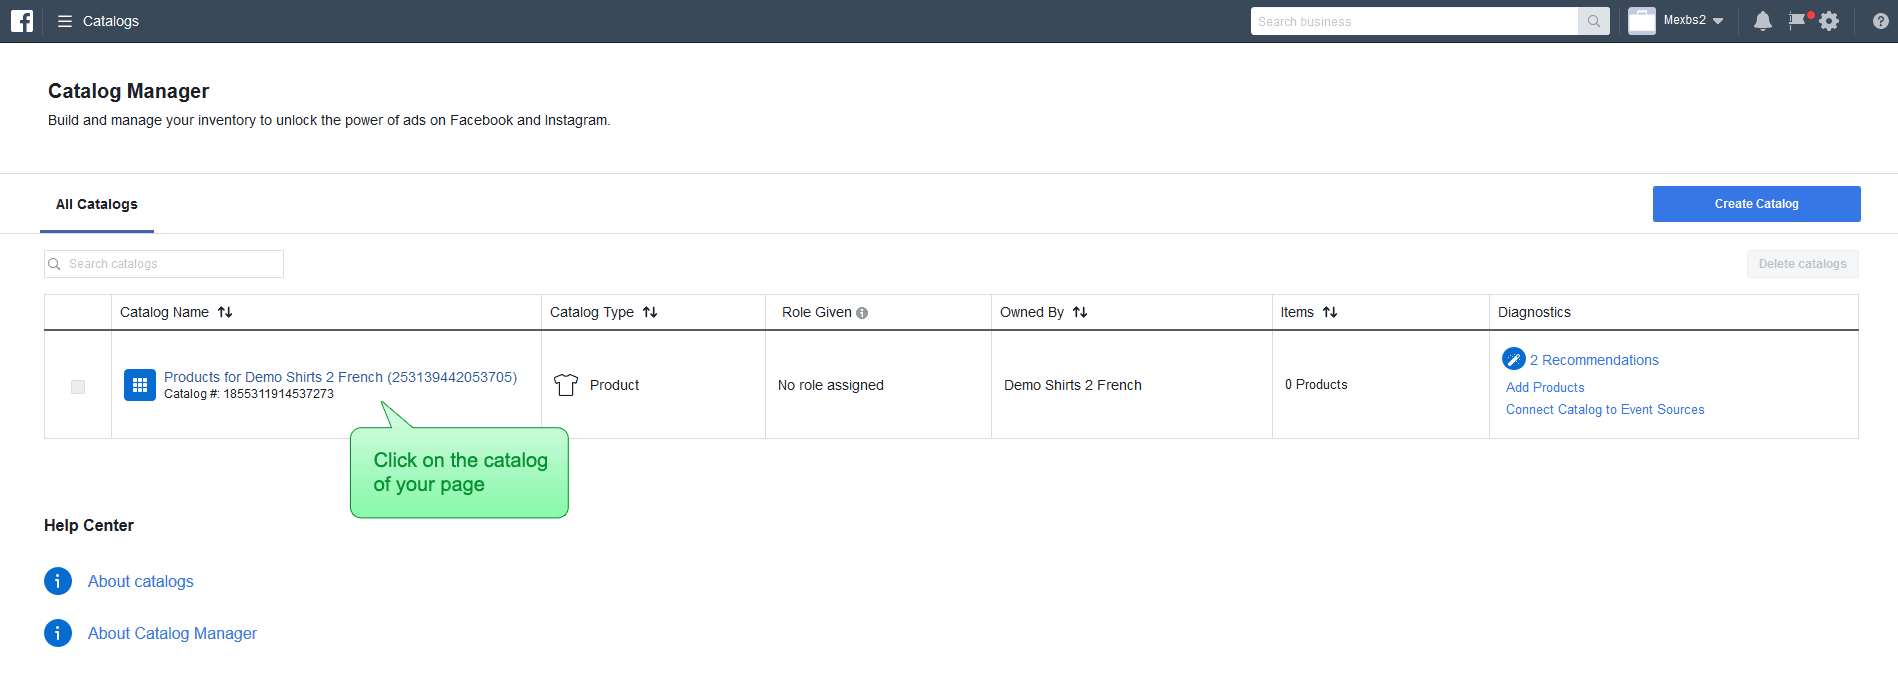
You should see a list of available catalogs. If you have a Facebook page and you’ve created a shop tab, you should see the name of your shop in the catalogs list. Click on it. If you don’t have a Facebook page and shop, and simply want to create dynamic ads, click “Create Catalog” and follow the creation flow.
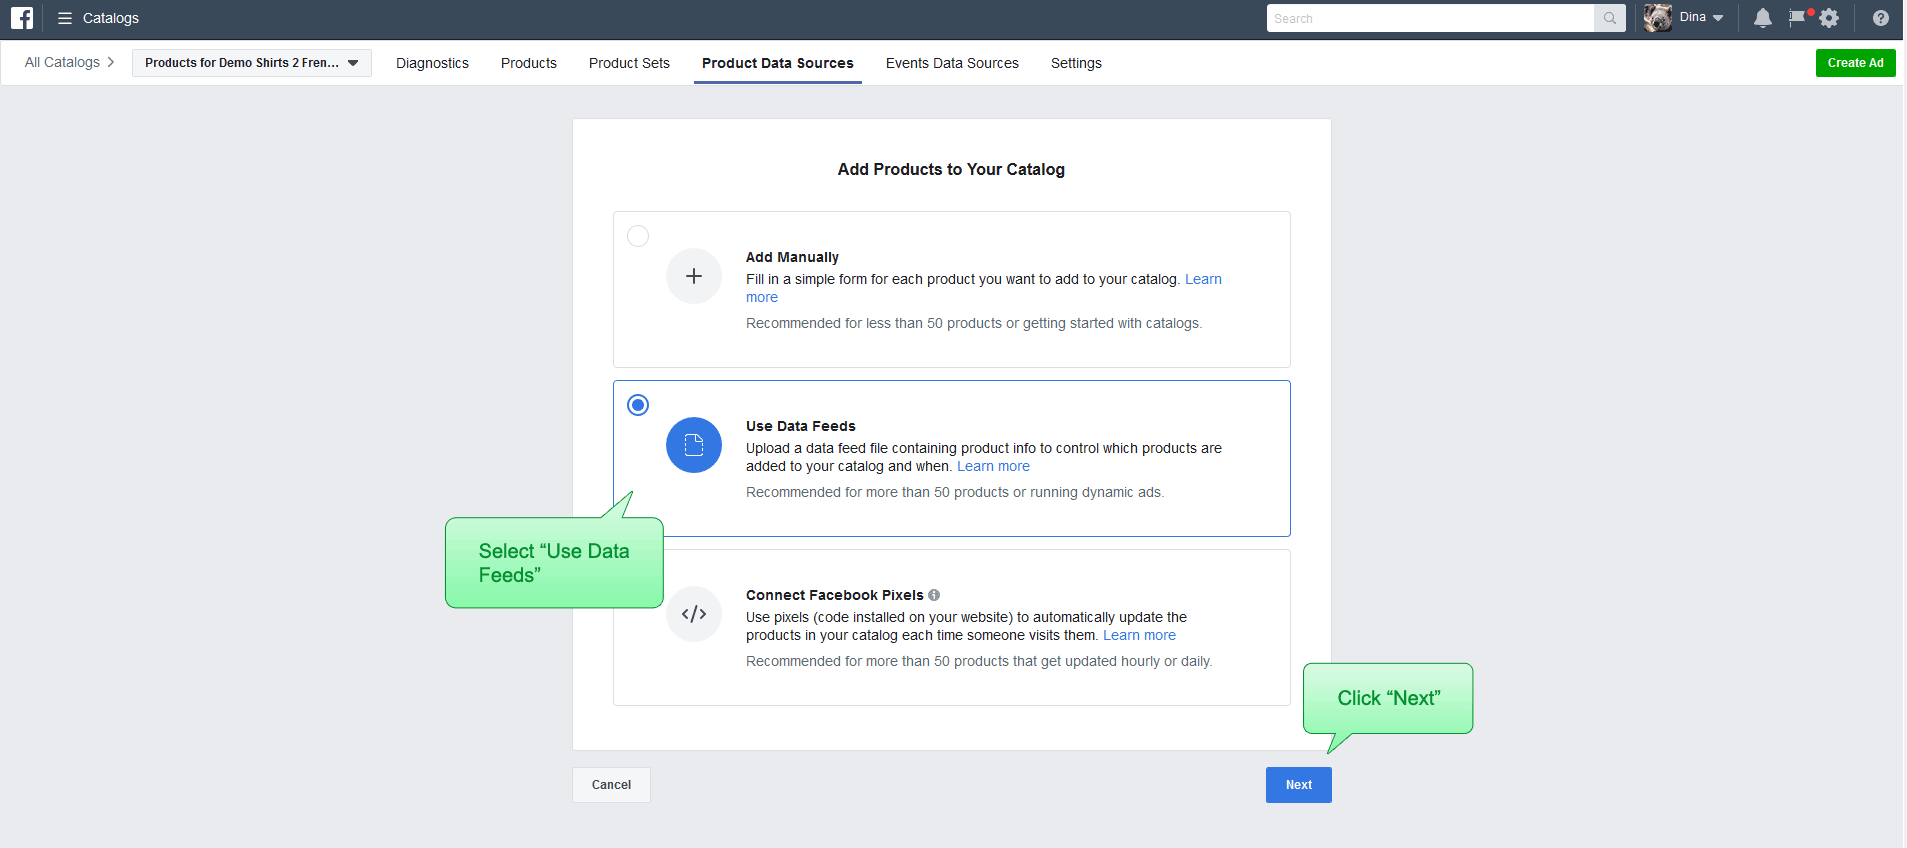
Click on the “Product Data Sources” on the top (or the left) of your page. Click “Add Data Source -> Add New Product”. You should get the following screen. Click “Use Data Feeds” and “Next” -
You should get the following screen -
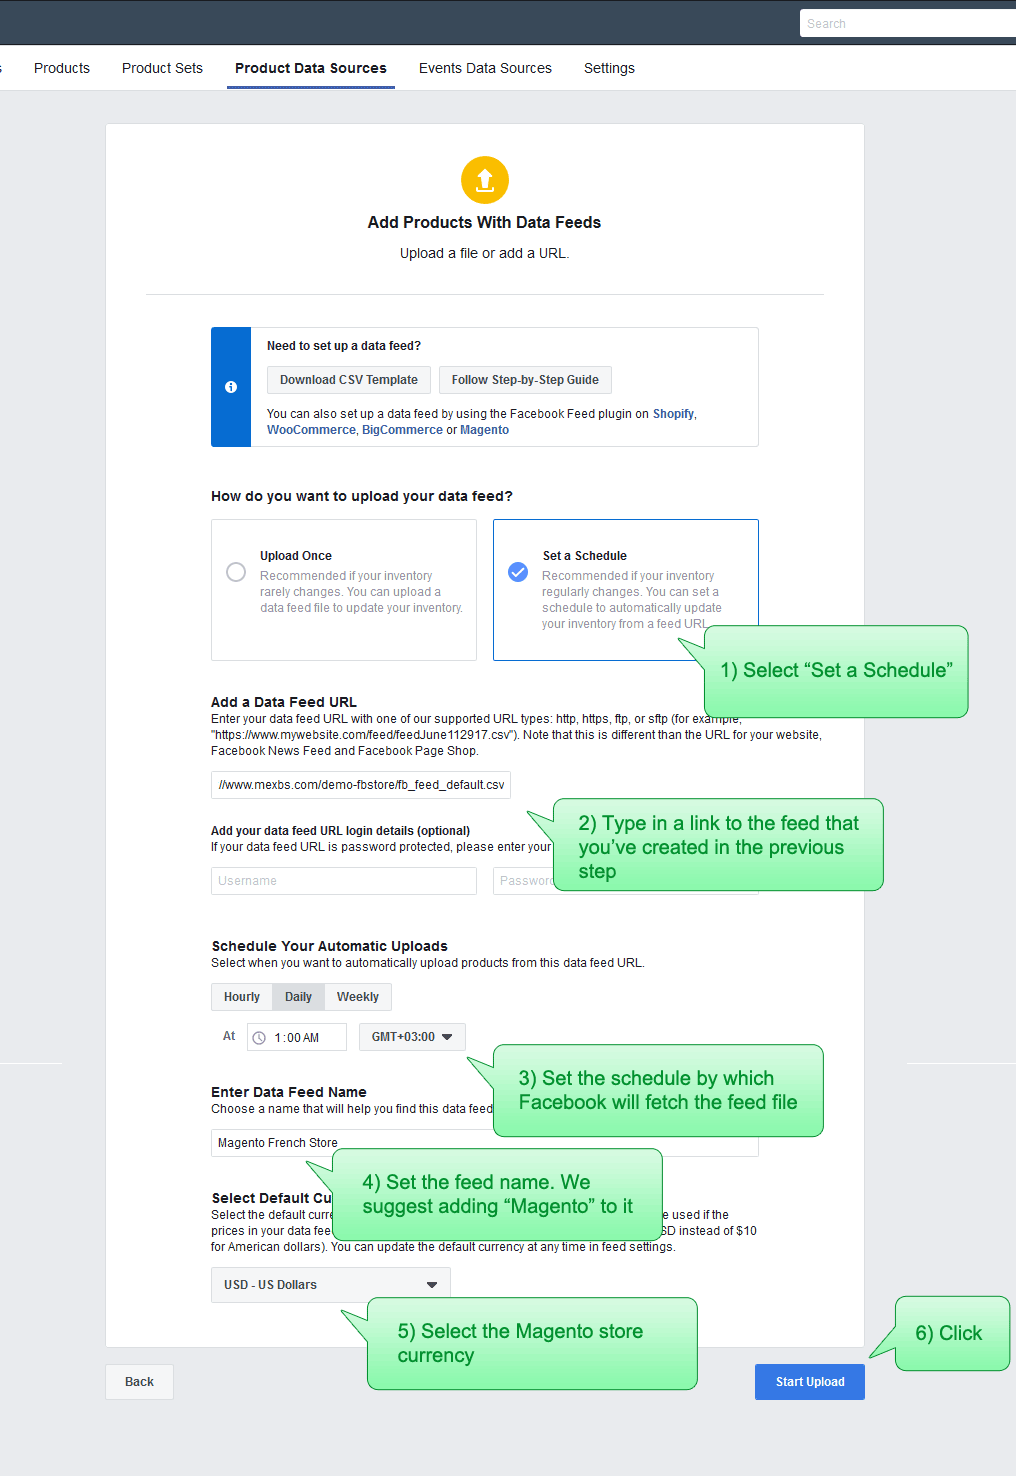
Click “Set a Schedule”. Then type in the link of your feed file that you’ve created in the previous step. Afterward set the schedule by which Facebook will fetch your feed file.
I suggest to make it daily - since this is going to be a replace schedule (in the replace schedule Facebook deletes all your products and adds them again. Therefore it is quite “heavy”). Afterwards, we will also create an update schedule (it is much “lighter” than the replace schedule because it only updates the information of the products that have been changed. However, it doesn’t process products creations and deletions. (For creations and deletions we need the replace schedule)).
Set the feed name, select the Magento store currency and click “Start Upload”.
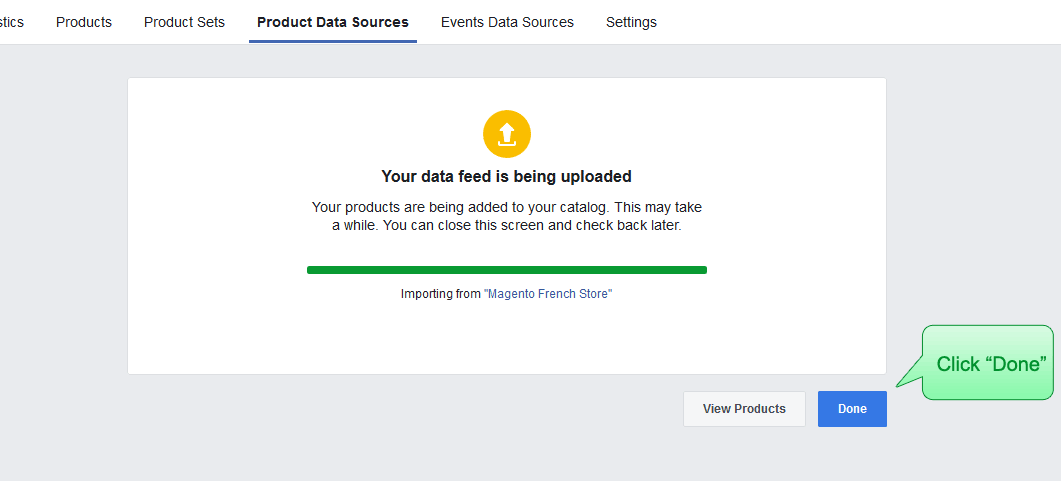
You should see the loading bar. Once the loading is done, click “Done” -
Now you should see the products showing up in your Facebook shop. However, before going to check them out, let's set up the update schedule first. (Remember? This is the “light” schedule - in this schedule Facebook just updates the information of the products that have been changed).
It is important to set up the update schedule if you are making changes to your products quite frequently. Another important reason is that from my experience, it seems to help with the mysterious problem where some product images are not showing up on the Facebook shop.
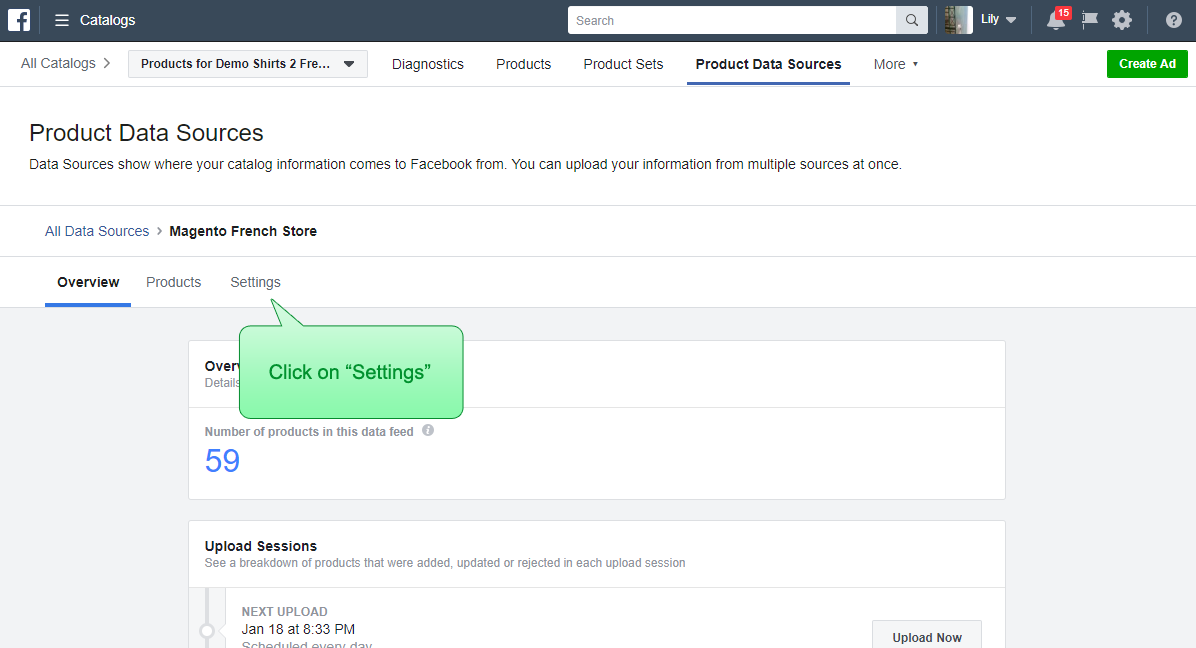
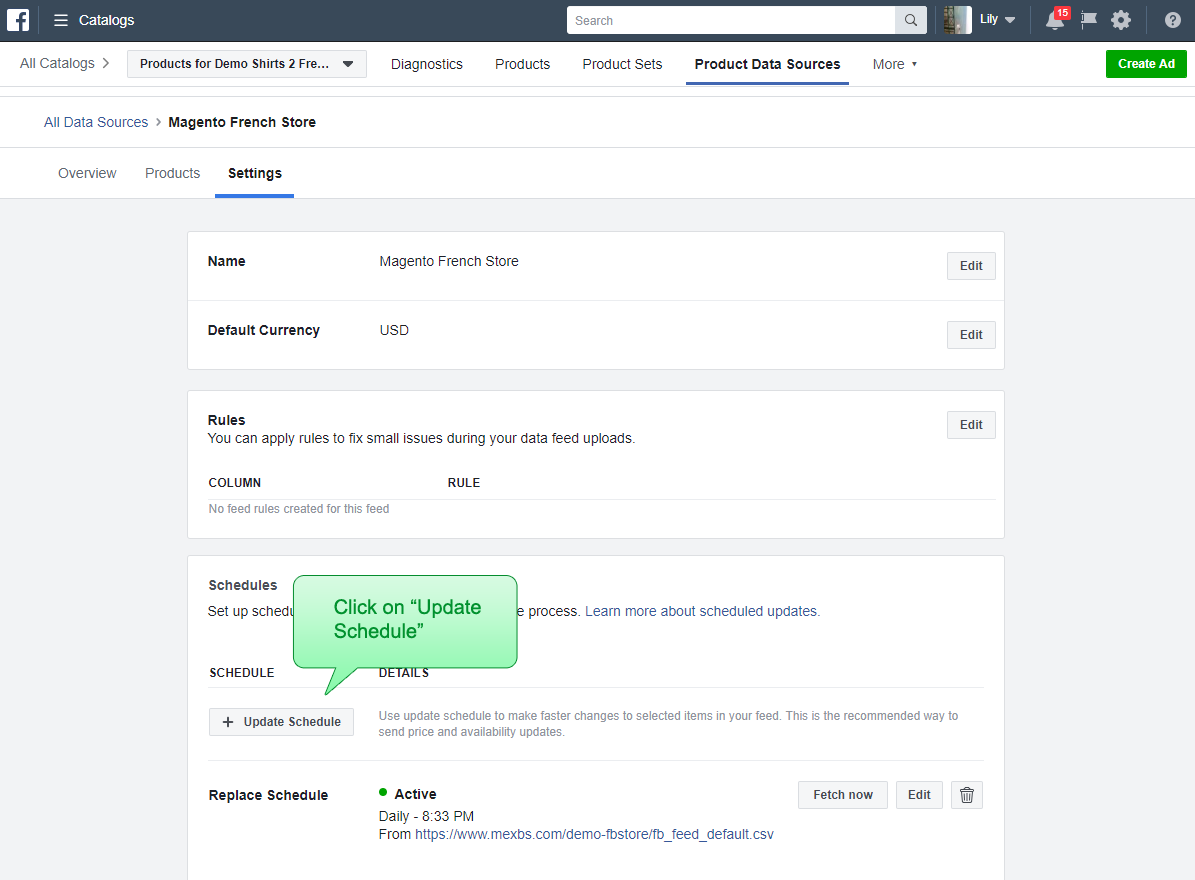
In the Business Manager click “Product Data Sources” and select the data source that you’ve just created. Click on the “Settings” tab -
Click on the “+ Update Schedule” -
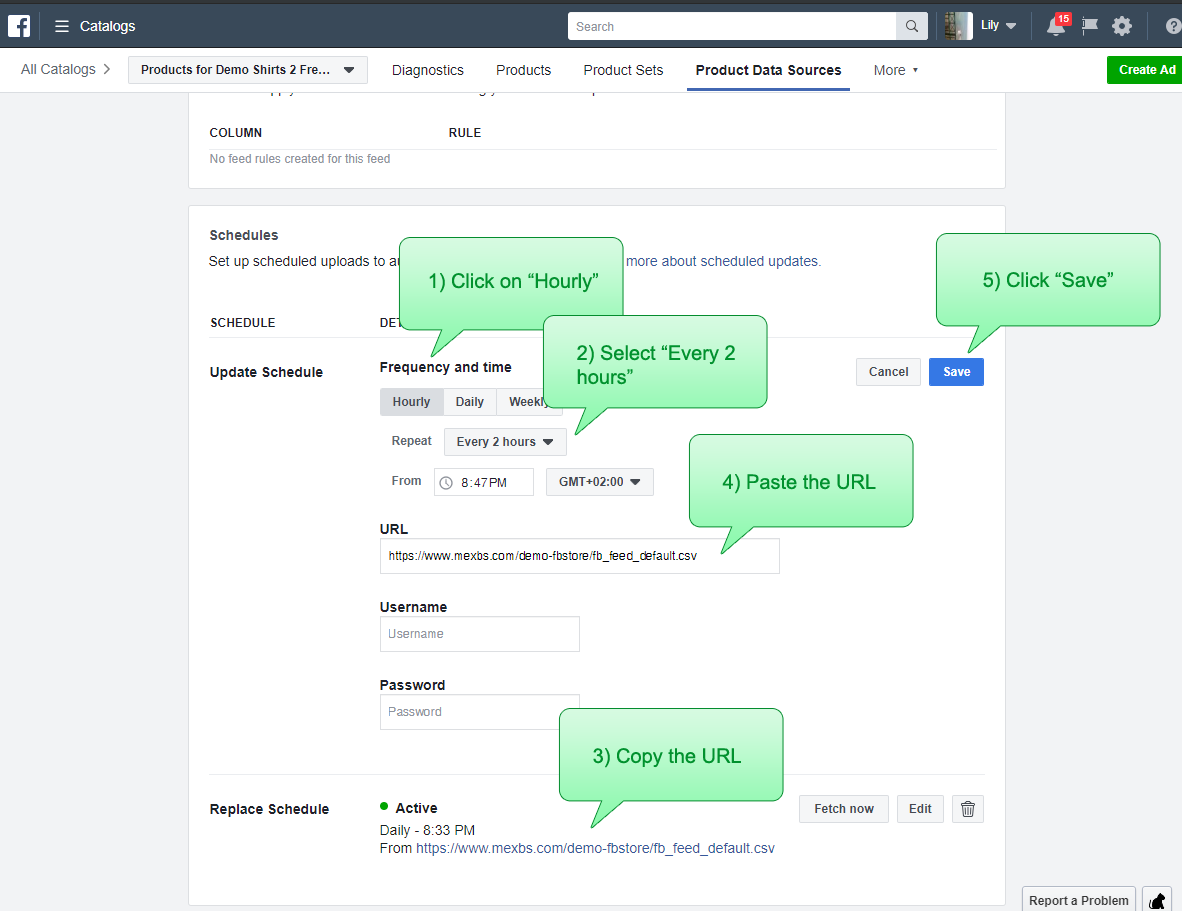
Copy the URL of the replace schedule that you’ve just created and paste it into the URL field. In the frequency and time select “Hourly -> Every 2 hours”. Finally, click “Save” -
Step 6 - verify that the Facebook shop / catalog was synced successfully
Now let's go to the Facebook shop tab and check that all of our products were uploaded successfully. We should see something like this -
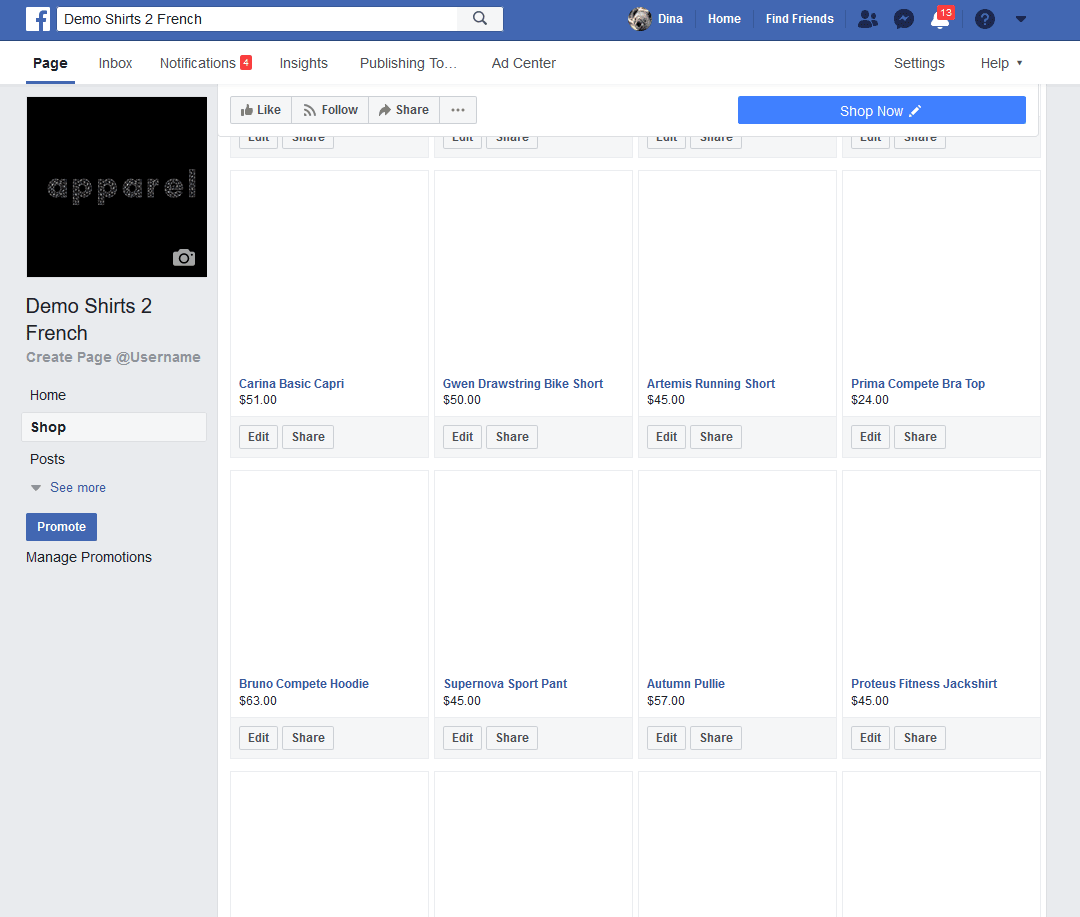
You can see that the images are missing. The reason is - Facebook is processing your products. It can take up to a few hours for Facebook to finish the processing (depending on your catalog size).
Note: There is an issue that we observed happening with big catalogs. The issue is that Facebook displays only around 300 products in the “All Products” in the Facebook shop. That is if you have (for example) 2000 products, only random 300 will show up in the “All Products”.
I guess Facebook does it to not to overload the page.
The only workaround that we’ve found to this issue is to break your products down to collections (again, a collection shouldn’t exceed 300 products). I won’t cover here how to create collections, but you can read about it here.
Try to click on a product. You will probably see something like this -
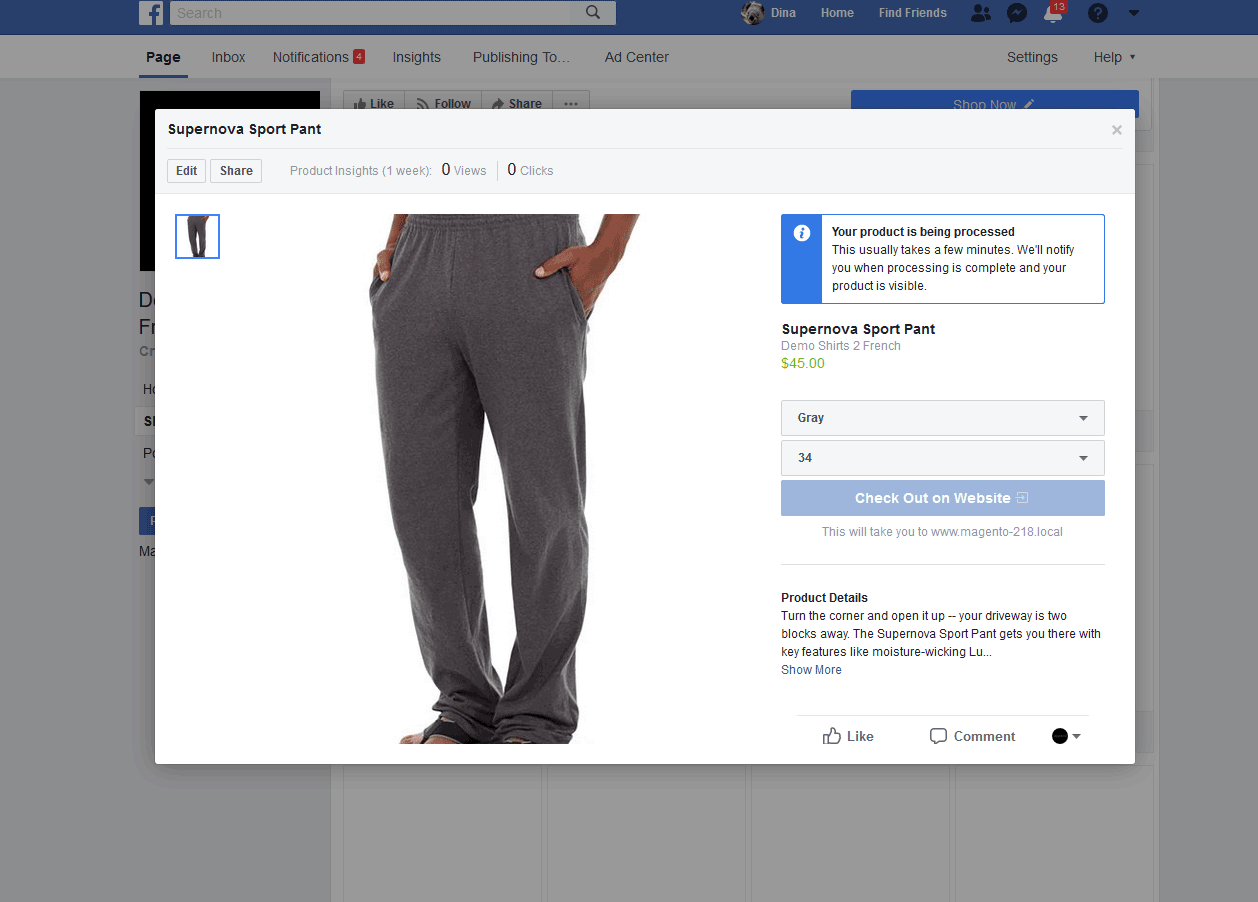
You can see that Facebook writes that the product is still being processed.
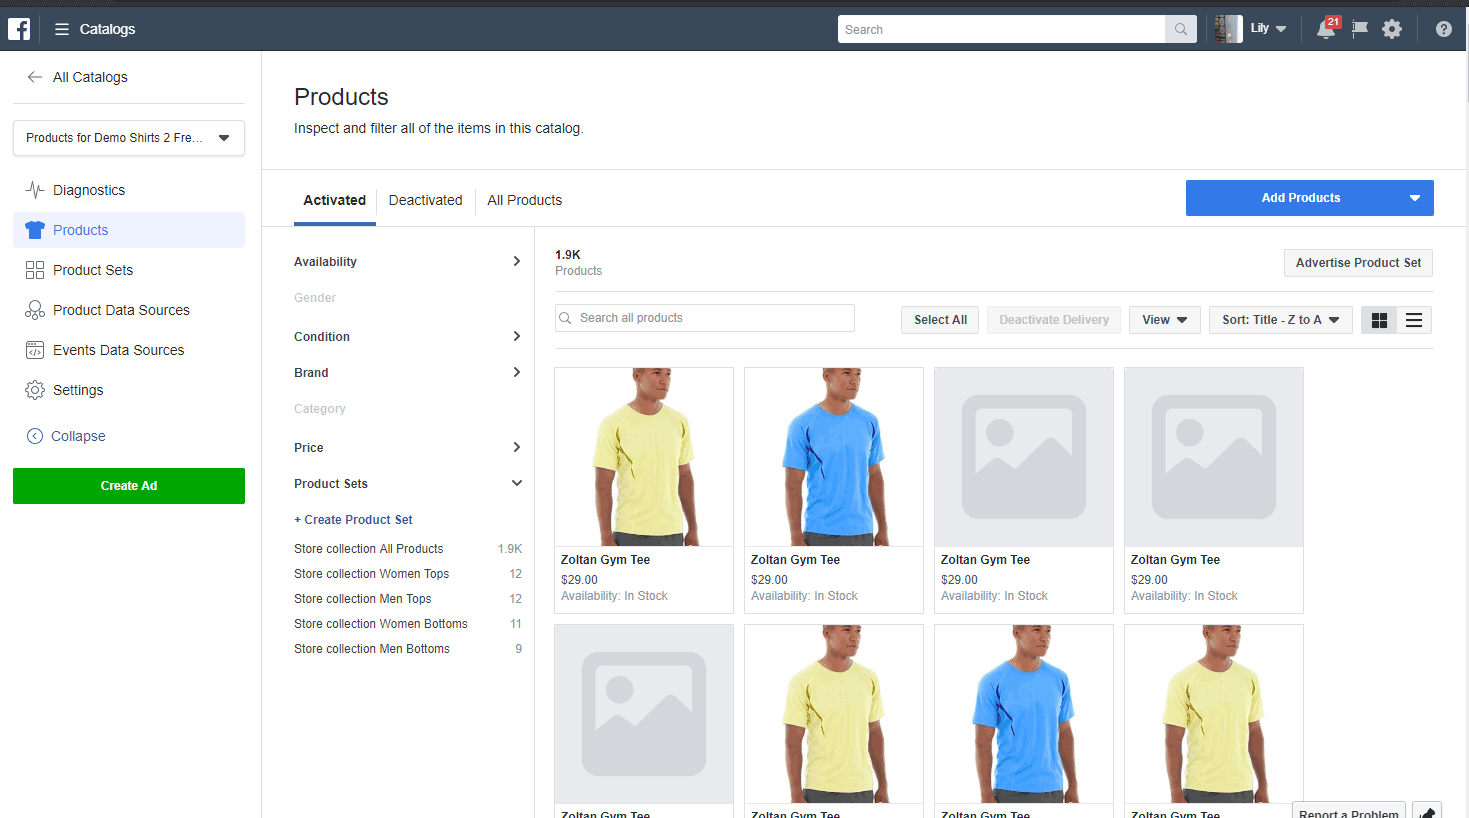
For the readers who didn’t set a shop and set up a catalog for the Dynamic Ads - go to the business manager → Catalogs. Click on the catalog that you’ve just created, and then on the “Products” tab. You should see all the products that you’ve just synced -
That’s it, after that the processing of the products is finished - you should see them in your Facebook shop tab and in the Facebook Business Manager catalog. Now you can also start creating Dynamic Ads.
Why would you possibly need an extension for the Facebook integration?
As you can see it is possible to create a Facebook shop (or a catalog) and upload your Magento products to it without a need for an extension. However, if you make frequent changes to your products, or if you have a big catalog - it can be a good idea to use an extension. An extension can save your time by automating the feed file creation and improving conversion by redirecting the customer to the checkout.
Our Facebook shop integration extension does just that - it creates the feed file for you on a regular base using cron. It also supports drop downs in configurable products (we will create an article about that soon, so you will be able to create drop downs yourself), and it redirects the customer directly to the checkout with the product added to his cart. It also keeps the logs of the feed generations, so you can tackle any problems with the feed.
To sum up
We’ve covered a whole lot of topics about the Facebook shop, Facebook Dynamic Ads and the Facebook pixel. We’ve also created our Facebook shop and set up the integration with Magento using the feed file.
I hope that this article helped you to understand the terms better and to set up your Facebook shop or the Dynamic Ads successfully!