Developing on the Magento cloud - a step by step tutorial
What is Magento Cloud?
Magento cloud is an all-in-one hosting, development, and deployment solution provided by Magento.
Magento cloud environments
When you subscribe to the Magento cloud plan, you receive a number of environments.
An environment is a standalone Magento installation. It has a separate server and a database. Additionally, if the environment is production or staging - it also has Fastly, and New Relic installed on it.
Magento cloud provides you with a number of environments. In the Starter plan, there are 4 environments - Production, Staging and two Dev environments. In the Pro plan, there are 8 environments - Production, Staging, Integration, Global Master and 4 Dev environments.
What is this tutorial about?
In this tutorial, I will present a Magento Cloud development flow chart. Afterwards, I will explain each step in the chart and show the commands that you need to run at each step.
At the end of this tutorial, all of the necessary environments will be set up and ready for work. Afterwards, we will deploy your first feature to the Magento Cloud.
In this tutorial, I will also show you how to install a specific Magento version on the Cloud, instead of the default one.
So let’s start with the tutorial and the flow chart.
Magento Cloud development - step by step tutorial (on the Starter plan)
From now on, I will be talking only about the Starter plan. However, working on the Pro plan is very similar, and I will explain the modifications that are needed to be done to the flow at the end of the article (here).
Here is the chart of the Magento Cloud Starter plan development flow -

You can see that the chart consists of two sections: “One time steps” and “Recurring steps”. As you can guess, the steps under the “One time steps” section you only follow once - when you set up the environments (master, Staging, dev4) for the first time.
After completing the one time steps, and having the Staging and the dev4 environments ready (dev4 is the name we gave to our development branch / environment - you can use any different name), you can proceed to the fun part - the development of your features.
The development workflow consists of the “Recurring steps” that are described in the chart. You should follow these steps each time you develop a new feature and want to publish it to the production (Master) environment.
Now we will go over each step in the chart, explain it and show the exact commands that you need to run.
Note: In my dev machine I am using Ubuntu 16.04 with git (version 2.7.4) installed on it.
Ok, let's start.
Part 1: One time steps
This part of the development flow, you only need to do once - when you set up the environment.
At the end of this part, you will have the necessary environments (master, Staging, and dev4) up and running, and you will be ready to start writing some code!
So let’s proceed to the steps.
Step 1: Clone the master branch to your dev machine
(1) Make sure that you have SSH keys set up on your dev server and the Magento Cloud
Before we can clone the master branch to our dev machine, we need to set up our SSH keys in the Magento cloud interface and our dev machine.
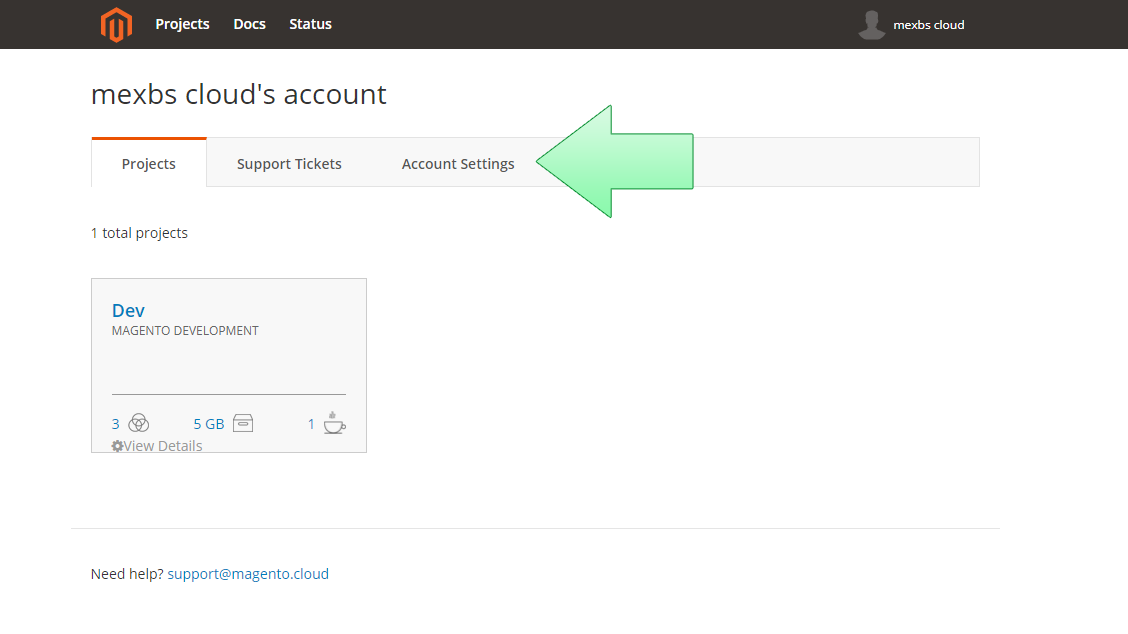
To do that, log in to the Magento cloud interface, by going to https://accounts.magento.cloud/ and logging in. Then click on the account settings -
Go to the SSH keys section and make sure that the keys that reside in your ~/.ssh directory on your dev machine exist in the SSH keys list. For the linux tutorial about how to get your keys set up read the “Enable SSH keys” tutorial by Magento.
(2) Copy the clone command from the Magento Cloud
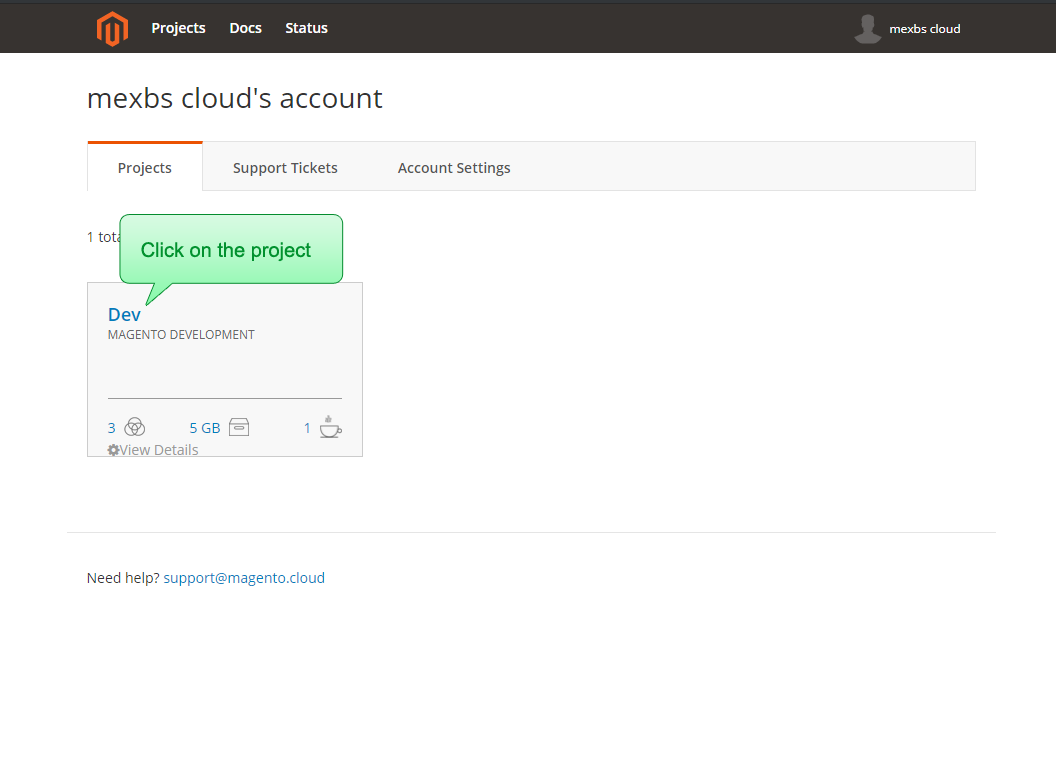
Go to your Magento Cloud account (https://accounts.magento.cloud/). Click on the project that you want to clone. In our case, we only have one project - “Dev” -
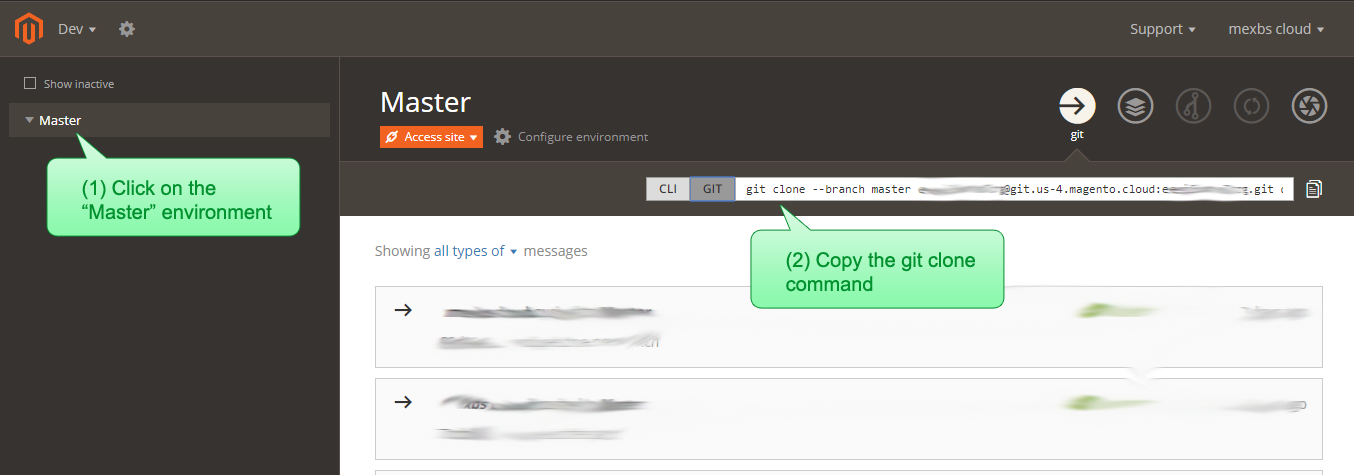
In the next screen, make sure to select the “Master” environment and copy the git clone command -
Now SSH to your dev machine, and go to your working directory (for example /var/www):
cd /var/www
Paste the clone command. It should look something like the following:
git clone --branch master [email protected]:eepi6abcdefgh.git dev
The cloning process should run and finish successfully, creating the /var/www/dev directory that includes the cloned files. If you go to the dev directory and do ls -la, you will see something like the following -

You can see that the vendor directory doesn’t exist. It is because it is created dynamically by the Magento build when you push changes to your branch - we will talk about it later.
Let’s open the .gitignore file. You will see the following:
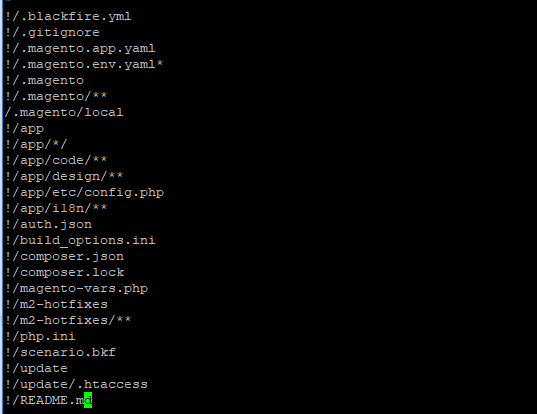
It means that everything except the listed files and directories is ignored. That is, you should only make changes to the files/folders in that list because the Magento Cloud build script will overwrite the others.
For the development process it means that if you want to add a new module / extension you should either do it by specifying it in the composer.json file - in this case the Magento build will pull it into the vendor directory, or you should work on your new module in the app/code directory, because it is not getting overwritten by the Magento build.
In this tutorial, we will only show how to develop your module in app/code. If you want your module to be pulled via composer, the process is almost identical to the described in this tutorial. The only difference is that in Step 10 instead of copying your module to app/code, you should pack it up and put it in your composer repository, and specify it in the composer.json.
Step 2: Modify the composer files to the desired Magento version
In this tutorial, we want to work on the Magento Commerce (Enterprise) 2.1.8. The newest Magento version at the moment is 2.3.2, but let's say that for some reason we need to work on 2.1.8.
To cause the master to build Magento Commerce 2.1.8, we first make sure that the correct PHP version is set in the .magento.app.yaml file. In the case of Magento 2.1.8, it should be 7.0.
Afterwards, we run the following commands, to set the composer to use our Magento version:
composer require magento/magento-cloud-metapackage 2.1.8  --no-update
rm -rf composer.lock
composer update
Step 3: Commit and push the changes to master
Run the following commands:
git add composer.json composer.lock .magento.app.yaml
git commit -m "Set Magento version to 2.1.8"
git push --set-upstream origin master
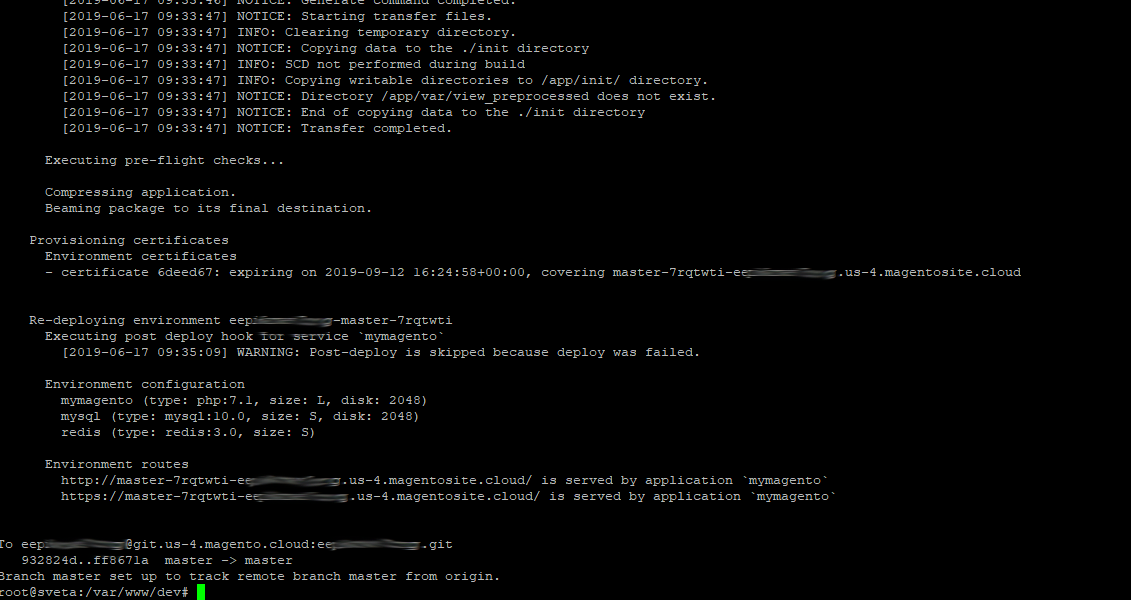
The Magento deployment and build will start. When it finishes successfully you will see something like the following in your CLI:
Note #1: If you get the error “Could not open input file: ./vendor/bin/ece-tools”, go back to step 2, and before the composer update command run the following command:
composer require magento/ece-tools --no-update
Then remove the composer.lock:
rm -rf composer.lock
And run the composer update again:
composer update
Now re-run the commands of Step 3 again (add, commit and push).
Note #2: If you get the error Failed opening required '/app/vendor/composer/../../app/etc/NonComposerComponentRegistration.php', run the following commands:
chmod 666 app/etc/NonComposerComponentRegistration.php
git add --force app/etc/NonComposerComponentRegistration.php
git commit -m "Fixed NonComposerComponentRegistration.php permissions"
git push --set-upstream origin master
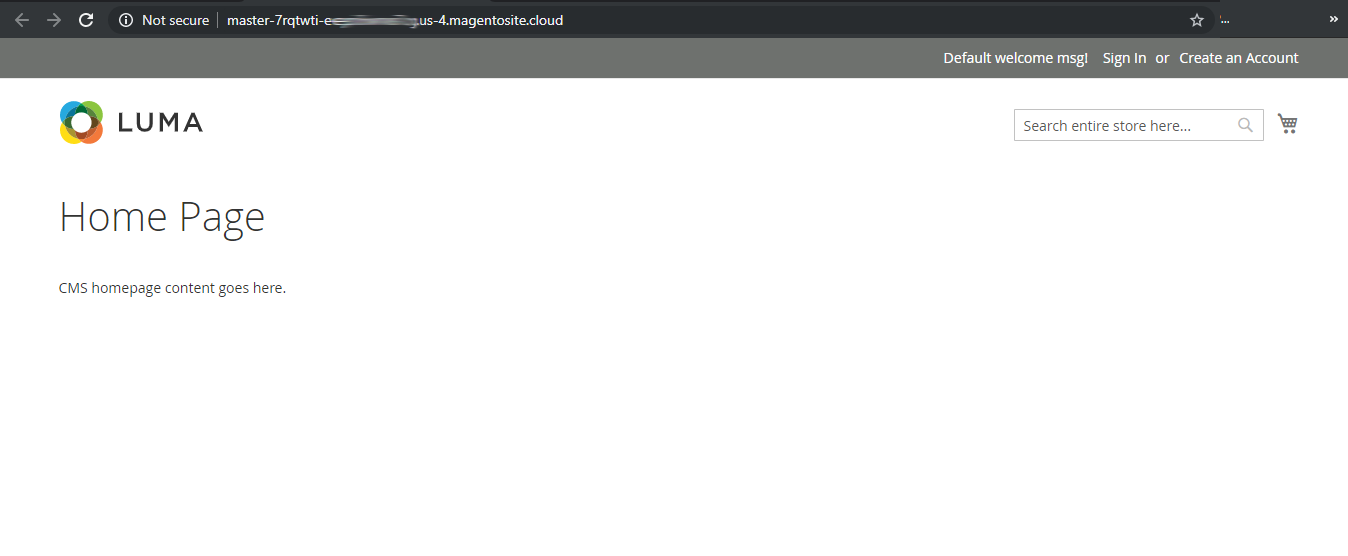
In the end of the successful build, it gave us the URL of the “master” website (In our case http://master-7rqtwti-eepabcdefg.crg.us-4.magentosite.cloud/)
Let’s try browsing there. You will probably get the following error screen -

The reason is that there is no Magento installed on the master - let’s install it now.
::: note If you get a Magento homepage screen, but you don’t remember ever installing Magento, SSH to the master environment by following “(1) SSH to the master environment” in Step 4 and then run the following command to uninstall Magento:
php bin/magento setup:uninstall
:::
Step 4: SSH to the master environment and install Magento
(1) SSH to the master environment
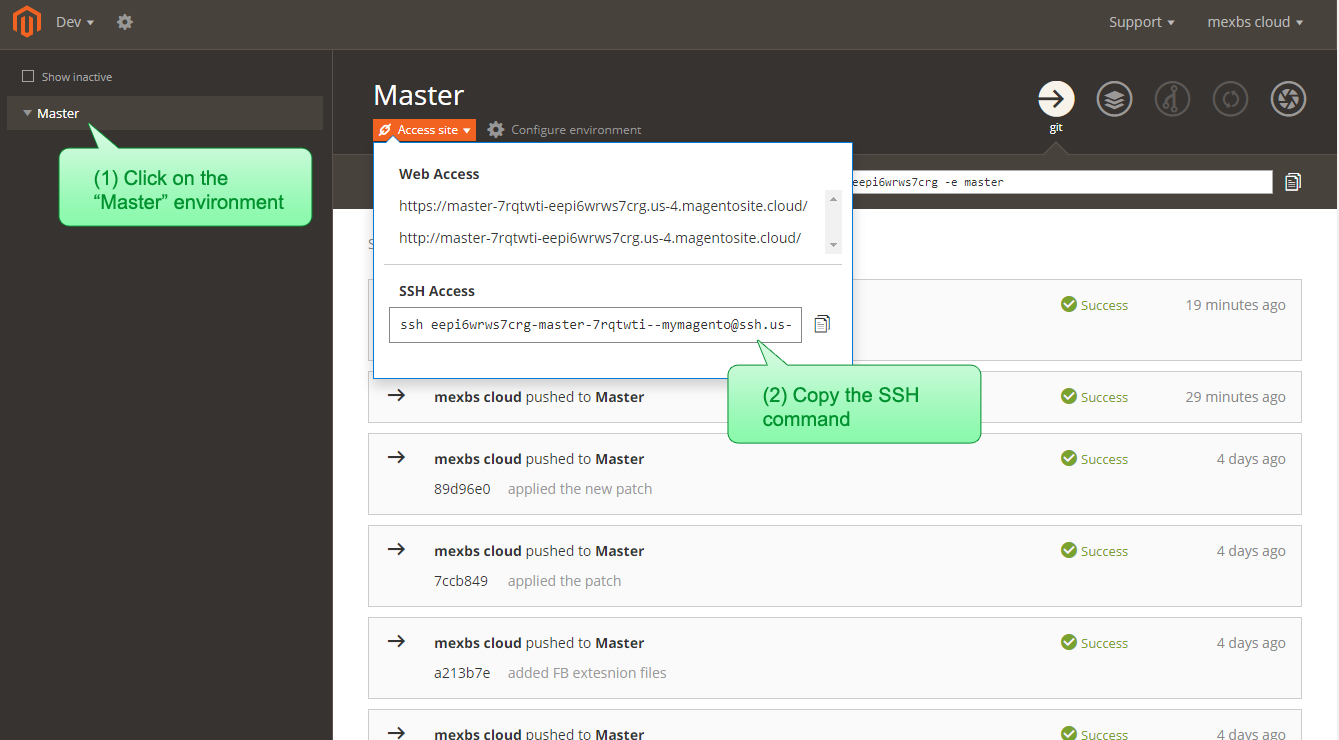
Go to the Magento Cloud interface, click on the Master environment, click on “Access Site” and copy the SSH Access field -
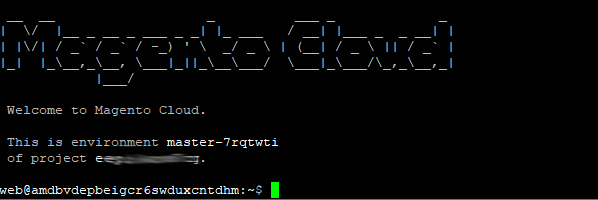
Now paste it in your dev server and hit “enter”. You should see the cloud welcome message -
(2) Install Magento
Install Magento by running the following command. Don’t forget to replace the --base-url value with the non HTTPS URL of your master environment (the one that was outputted on the CLI at the end of the build. You can also find it by going to the Magento Cloud interface, and clicking on “Access Site”.). Also, replace the login credentials to the ones that you want.
php bin/magento setup:install \
   --admin-firstname=AdminName \
   --admin-lastname=AdminLastname \
   [email protected] \
   --admin-user=admin \
   --admin-password=123456 \
   --base-url=http://master-7rqtwti-eepi6wrws7crg.us-4.magentosite.cloud/ \
   --db-host=database.internal \
   --db-name=main \
   --db-user=user \
   --currency=USD \
   --timezone=America/Chicago \
   --language=en_US \
   --use-rewrites=1
If you get an error during the installation in which Magento complains that it can’t write to the session directory, try uninstalling Magento:
php bin/magento setup:uninstall
And then installing Magento with the setting --session-save=db:
php bin/magento setup:install \
   --admin-firstname=AdminName \
   --admin-lastname=AdminLastname \
   [email protected] \
   --admin-user=admin \
   --admin-password=123456 \
   --base-url=http://master-7rqtwti-eepi6wrws7crg.us-4.magentosite.cloud/ \
   --db-host=database.internal \
   --db-name=main \
   --db-user=user \
   --currency=USD \
   --timezone=America/Chicago \
   --language=en_US \
   --use-rewrites=1 \
   --session-save=db
Once the Magento installation succeeds, you should see the following -
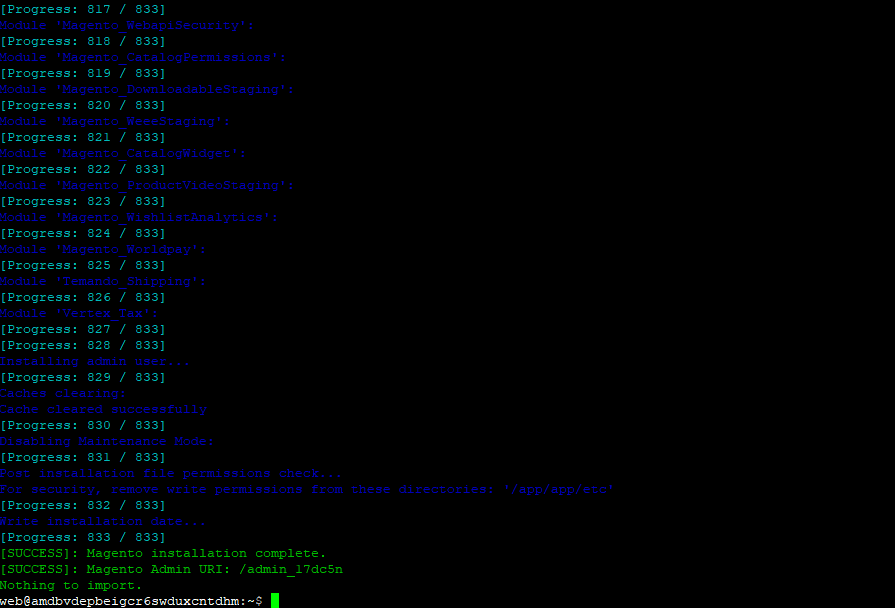
Copy the admin path (in my case it is admin_17dc5n) to be able to access the admin panel. (If you lose it, you can find it in app/etc/env.php file)
Now run the static files deployment:
php bin/magento setup:static-content:deploy
Now browse to the Master website again, and you should see the Magento homepage screen - Hooray!
Step 5: Create the Staging environment out of Master, and activate the Staging environment
(1) Create the Staging branch
Create the Staging branch and push it by running the following commands:
cd /var/www/dev
git checkout -b Staging
git push origin Staging
(2) Activate the Staging environment
To activate the Staging environment, we first need to install the “magento-cloud” command on our dev server. To do that, run the following commands in your CLI (SSH):
curl -sS https://accounts.magento.cloud/cli/installer | php
Now run the command “su -” or simply restart the SSH (I use Putty, so I simply closed it and re-opened again). This is needed for the magento-cloud command to start working on the CLI. Don’t forget to return back to your working directory (in my case /var/www/dev) after re-logging in.
Now login to the magento-cloud by running:
magento-cloud auth:password-login
The system will ask for your Cloud username and password. Pay attention that even though Magento Cloud is now using the Magento website credentials to login to their web interface, the credentials that we are asked for now are the old Magento Cloud credentials.
You can find your Magento Cloud username, by going to the Magento Cloud interface (https://accounts.magento.cloud/), clicking “Account Settings”, and checking the “Create New Password” checkbox -
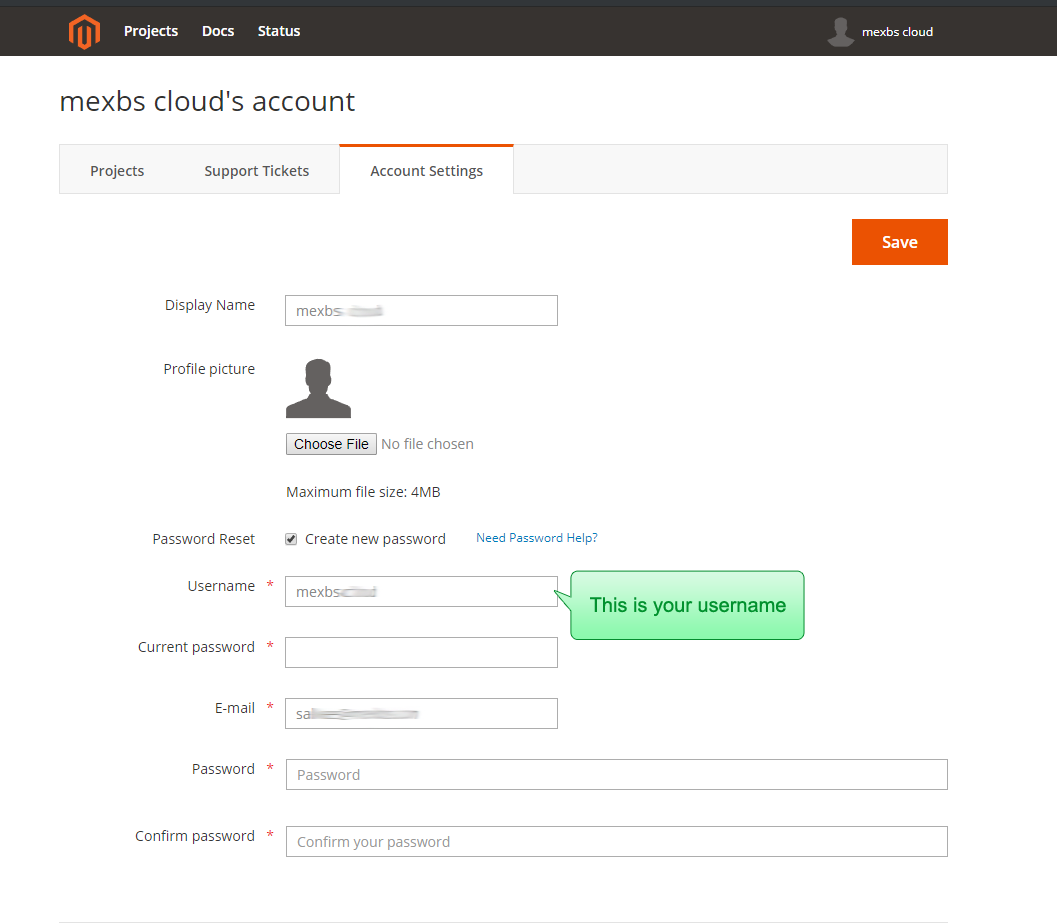
After successful authentication, you will see the following message:

Now we can activate our Staging branch, by running:
magento-cloud environment:activate Staging
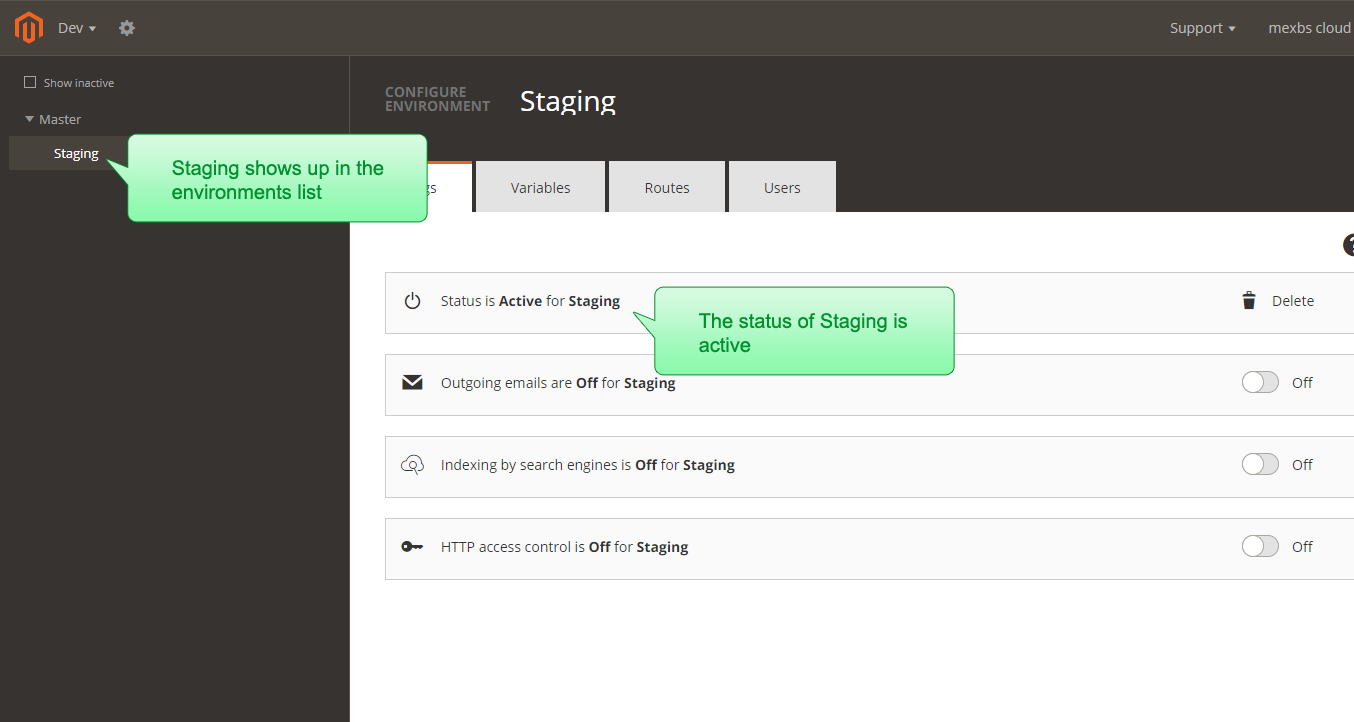
After the successful deployment, you should see a success message. Let’s double check that the environment “Staging” was indeed created and activated, by going to the Magento Cloud web interface, our project, and making sure that “Staging” shows up on the top left.
If you click on it, and then click on the “Configure Environment” button, you will see that it’s status is “Active” -
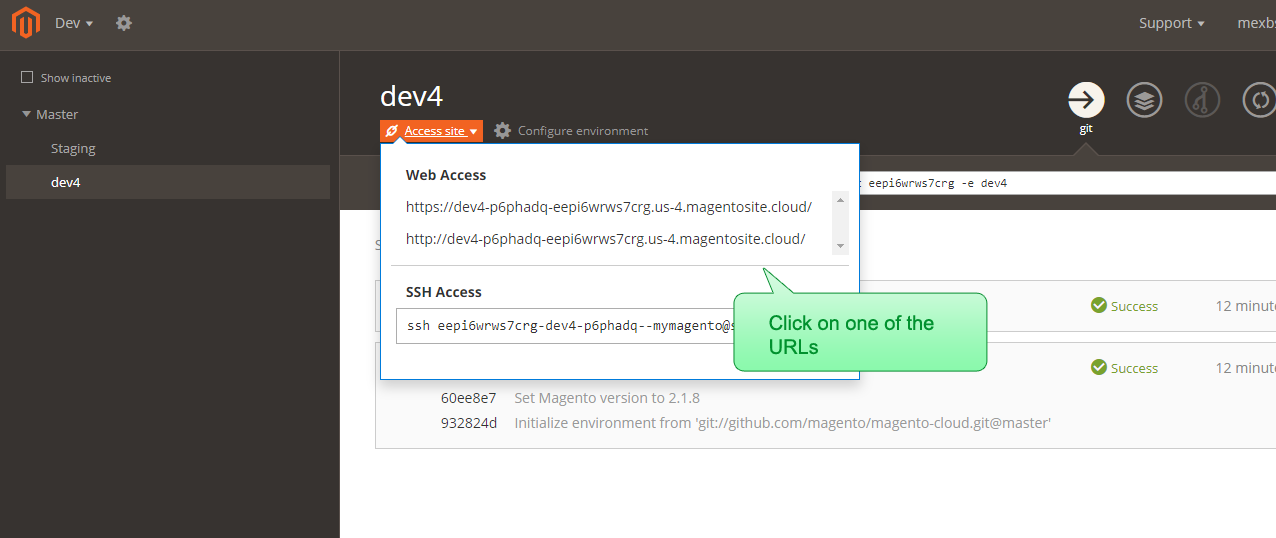
Now click on Staging on the top left, click on “Access Site” and click on one of the URLs -

You should see a Magento homepage - Hooray!
You can see that unlike the Master environment, the Staging environment has Magento installed on it already. It seems that the Magento Cloud copied the Database from Master for the Staging environment.
I think that it is really cool because it saves you the work of duplicating the DB yourself.
Important: make sure that it didn’t redirect you to the Master URL. If yes, perform the following steps to fix the issue:
SSH to the Staging environment. Then access the DB by running:
mysql -h database.internal -u user
Afterward, run:
use main;
update core_config_data set value="http://staging-vdt2zeq-eepi6abcdefgh.us-4.magentosite.cloud/" where path="web/unsecure/base_url";
(make sure to replace http://staging-vdt2zeq-eepi6abcdefgh.us-4.magentosite.cloud/ with the URL of your staging environment) Afterward, exit the mysql and flush the cache by running
php bin/magento cache:flush
Step 6: Create the dev4 branch out of Staging, and activate the dev4 environment
Now we move on to creating our development branch / environment “dev4”.
(1) Create the dev4 branch
Create your development branch (in our tutorial, we give our development branch the name “dev4”) and push it by running the following commands:
cd /var/www/dev
git checkout -b dev4
git push origin dev4
(2) Activate the dev4 environment
To activate our dev4 environment, run:
magento-cloud environment:activate dev4
After the successful deployment, you should see a success message. Let’s double check that the environment “dev4” was indeed created and activated, by going to the Magento Cloud web interface, our project, and making sure that “dev4” shows up on the top left.
If you click on it, and then click on the “Configure Environment” button, you will see that it’s status is “Active” -

Now click on dev4 on the top left, click on “Access Site” and click on one of the URLs -
You should see a Magento homepage - Hooray!
You can see that similarly to the Staging environment, the dev4 environment has Magento installed on it already (the DB is duplicated from Master).
Step 7: Set up a Database and install Magento on your dev server in the local-dev directory
(1) Setup LAMP (Linux, Apache, MySQL, PHP) on your dev server
To be able to develop on your dev machine, you need first to install LAMP on it. We won’t cover the steps for it in our tutorial, but there are tons of great tutorials for that. For example, the “How To Install Linux, Apache, MySQL, PHP (LAMP) stack on Ubuntu 16.04” article by DigitalOcean.
(2) Download and Install Magento
After setting up LAMP on your dev server, it’s time to download and install Magento.
Pay attention that you should install Magento in a directory other than the directory where the code of the dev4 branch resides. (In our case the code of dev4 branch is in /var/www/dev, so we will install Magento in /var/www/local-dev).
We don’t suggest that you will develop your code directly in /var/www/dev because it has many missing files to run Magento. We found that it is much less troublesome to install Magento and work on our features development in a different directory. So in our case, we created /var/www/local-dev directory on our dev server and installed Magento there.
To install Magento, create a new directory on your server (in our example /var/www/local-dev) and follow one of the great Magento installation tutorials out there (for example “Install Magento On Ubuntu 17.04 | 17.10 With Apache2, MariaDB And PHP” tutorial by Website for Students).
Once the Magento is working on your dev server, it’s time to proceed to the fun part - writing some code!
The next part is called “Recurring Steps” - as its name says, you will need to perform these steps over and over again each time you go through a development cycle.
Part 2: Recurring steps
Now you should have your environments set up. In this point, you are ready to start developing your features, test them locally and deploy them to dev4, Staging, and Master (in this order).
Let's go over the development workflow steps and explain them one by one.
Step 8: Go to the dev directory on your local server, switch to dev4, pull staging into it, and copy the tracked files to local-dev
Make sure that you are on the up-to-date dev4 branch, by going to the dev directory on your dev machine (in our tutorial it is located in /var/www/dev), and running:
git checkout dev4
git pull origin dev4
Now merge in Staging by running
git pull origin Staging
If there are some changes on Staging, you might also want to push them to your dev4 branch, to keep the remote branch up-to-date:
git push origin dev4
Now copy the tracked files from /var/www/dev to /var/www/local-dev. This is needed for your local environment to be up-to-date with the changes on dev4 -
cp -a /var/www/dev/app/* /var/www/local-dev/
cp -a /var/www/dev/composer.json /var/www/local-dev/
Step 9: Develop your feature in local-dev
Now it’s time to work on your feature in the local-dev directory.
We are going to create a HelloWorld module that will display a “Hello World” message in the header.
(1) Add the HelloWorld module files
Create the HelloWorld module by creating the following files in /var/www/local-dev:
<?php
\Magento\Framework\Component\ComponentRegistrar::register(
    \Magento\Framework\Component\ComponentRegistrar::MODULE,
    'Mexbs_HelloWorld',
    __DIR__
);
<?xml version="1.0"?>
<config xmlns:xsi="http://www.w3.org/2001/XMLSchema-instance" xsi:noNamespaceSchemaLocation="../../../../../lib/internal/Magento/Framework/Module/etc/module.xsd">
    <module name="Mexbs_HelloWorld" setup_version="1.0.0" />
</config>
<?xml version="1.0"?>
<page xmlns:xsi="http://www.w3.org/2001/XMLSchema-instance" xsi:noNamespaceSchemaLocation="urn:magento:framework:View/Layout/etc/page_configuration.xsd">
    <body>
        <referenceContainer name="page.top">
            <block class="Magento\Framework\View\Element\Template"
                   name="hello.world.test"
                   template="Mexbs_HelloWorld::hello_world.phtml"
                   before="-"
                    />
        </referenceContainer>
    </body>
</page>
Hello World!!!
(2) Install the HelloWorld module on your local environment
Run the following commands to install the HelloWorld module on your local dev server:
php bin/magento module:enable Mexbs_HelloWorld --clear-static-content
php bin/magento setup:upgrade
php bin/magento cache:flush
php bin/magento setup:static-content:deploy
(3) Test the feature
Let’s go to the HomePage - we should see the “Hello World!!!” message showing up in the header -

Now when we finished testing our feature, it’s time to commit it, push and deploy to dev4.
Step 10: Once the feature is ready, copy the contents of the app directory from local-dev to dev4 directory
Copy the content of the app directory from /var/www/local-dev to /var/www/dev by running:
mkdir /var/www/dev/app
cp -r /var/www/local-dev/app/* /var/www/dev/app
Add the changes to git:
git add app/
Step 11: Commit to dev4 and push
Commit the changes to dev4 and push by running:
git commit -m "Added HelloWorld module"
git push origin dev4
Now, go to the dev4 environment frontend and you should see the “Hello World!!!” showing up!
Step 12: Does the feature look good on the dev4 branch and is ready to go live?
If you find some bugs and therefore you think that the feature is not ready to go live - go back to Step 8.
Otherwise, proceed to the next step.
Step 13: Merge dev4 to the Staging branch and push (directly or using a pull request)
Now we are ready to merge our development branch (dev4) to staging.
Why is it important to merge to Staging instead of directly merging to master?
It is essential to merge your dev branch to Staging (once the feature is ready) and not directly to master, because of the following reasons:
-
The staging is much closer (setup wise) to the production (master) environment than dev4. Unlike the dev environment, it has Fastly and New Relic installed on it. On the Pro plan, Staging and production also share the same dedicated server.
-
If more than one developer is working on the project - Staging is the perfect environment to test your features together, before merging them to production
Let’s proceed with merging dev4 to Staging. Run the following commands:
git checkout Staging
git pull origin Staging
git pull origin dev4
git push origin Staging
Now the Cloud build should start, and after it finishes, you should see the “Hello World!!!” showing up on the Staging home page.
Step 14: Was the feature tested on Staging and worked fine?
If for some reason the feature doesn’t work correctly on Staging (for example because it conflicts with the features of other developers, or doesn’t work with Fastly, etc), debug it on your local server and then proceed to Step 8.
Otherwise, proceed to the next step.
Step 15: Merge the Staging branch to the master branch and push
This is the most exciting step because your feature (and perhaps the features of the other developers who took part in the current dev cycle - if you work by agile methodology and have sprints) is about to be deployed to production!
Do it by performing the following steps:
git checkout master
git pull origin Staging
git push origin master
Now the master build should start, and after it finishes successfully - the “Hello World!!” message should show up on the production home page.
Hooray! Our first development cycle is done!
What next?
Once you get some new features / bug fixes to work on, simply go to Step 8 and work your way from there until you get here again.
The Pro plan vs the Starter plan - the development workflow differences
If you have the Magento Cloud Pro plan, there are slight modifications that need to be done to the development workflow presented in this tutorial.
Let’s first look at the differences in the architecture between the Starter plan and the Pro plan.
The architectural differences between the Starter plan and the Pro plan
The main differences are:
- In addition to the Production and Staging environments that the Starter plan has, the Pro plan has also the Global Master and the Integration environments:
The Global Master environment should always contain the latest master code and is used for emergency debugging.
Here is what Magento documentation says about the Global Master: “The Global Master branch is a part of the Integration environment. You should always push a copy of the Production code to the Global Master in case there is an emergent need to debug the Production environment without interrupting services.”
A developer and a friend of ours suggested that he uses the Global Master to do destructive tests when something doesn’t look right on production. For example: deleting and changing products and customers.
Another friend suggested that it is a good Git practice - having one environment / branch that matches the production. In addition to the destructive tests, he says, you can use it always to be able to roll back to it as the latest working branch. (For example after applying an erroneous patch on master).
The Integration environment provides the opportunity to perform another layer of testing before deploying to the Staging environment.
- Unlike the two active dev branches / environments in the Starter plan, in the Pro plan, you can have up to four active dev branches / environments.
The modified development flow - Pro plan
Here is a chart of the Magento Cloud Pro plan development flow -

You can see that we added a few new steps that are related to the Integration and the Global Master branches. We also changed a few steps. The new steps and the changes are highlighted in light blue.
Now we are going to explain the modifications that we did to the flow. Pay attention that if the step doesn't show up in the list of modified steps, it means that it is identical for Starter and Pro plan.
Here is the explanation for our modifications:
Step 4.1: Create the Global Master environment out of Master, and activate the Global Master environment
To perform this step, follow step 5, but instead of Staging use the name of the Global Master branch.
Step 5.1: Create the Integration branch out of Staging, and activate the Integration environment
To perform this step, follow step 5, but instead of Staging use Integration.
Step 6: Create the dev4 branch out of Integration, and activate the dev4 environment
Step 6 has slightly changed - instead of creating the dev4 branch out of Staging, we create it out of the Integration branch.
Step 8: Go to the dev directory on your local server, switch to dev4, pull Integration into it, and copy the tracked files to local-dev
Step 8 has slightly changed - instead of pulling the Staging into the dev4 branch, we pull Integration into dev4 instead.
Step 12.1: Merge dev4 to the Integration branch and push (directly or using a pull request)
To perform this step, follow Step 13, but instead of Staging, use Integration.
Step 12.2: Was the feature tested on Integration and worked fine?
In this step, check if the feature works well on the Integration environment and therefore is ready to be merged to Staging.
Step 15.1: Merge the master branch to the Global Master branch and push
This is the extra step that needs to be done after the merge to master. Merge master branch to the Global Master by running the following commands:
git checkout [name-of-Global-Master]
git pull origin master
git push origin [name-of-Global-Master]
Replace [name-of-Global-Master] with the name of the branch that is your Global Master branch.
What is next for the Pro plan?
Once you get some new features / bug fixes to work on, simply go to Step 8 and work your way from there until you get here again.
Otherwise, that’s it!
Summing up
Magento Cloud is an excellent solution that takes care of the infrastructural part of the development cycle for you. You don’t need to worry about server maintenance, deployment, downtime, git hosting, and more. All that is left for you is to develop, test your feature, and go live.
In this tutorial, we presented our development workflow chart for the Magento Cloud Starter plan and the Pro plan. It should help you get started with the Magento cloud development, and also reminding you where to proceed at any point of your development cycle.